Looking for the perfect summer burger? Look no further, honey! This burger is sweet, savory, packed with protein, and has tons of umami flavor.
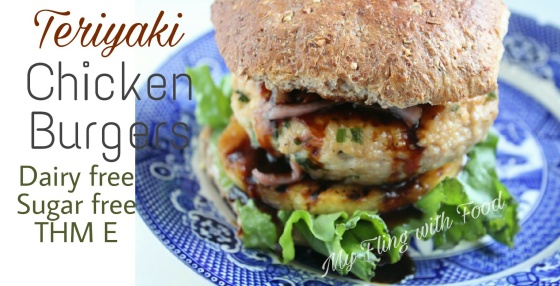

Looking for the perfect summer burger? Look no further, honey! This burger is sweet, savory, packed with protein, and has tons of umami flavor.
I started making this salad when my husband and I went vegan a few years ago, and all but forgot about it until recently. It’s a summer favorite because it can be enjoyed warm or cold, and it requires minimal cooking.

This salad is mostly raw/no-cook – the only component that requires cooking is the rice. You can use leftover brown rice, or you can cook it fresh. I prefer to cook the rice fresh, because I think the lime flavor soaks best into warm rice as opposed to chilled.
I start by chopping the peppers and onion, and placing it into the bottom of a large mixing bowl.
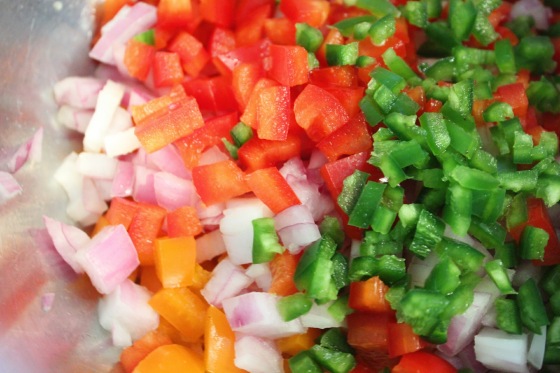
I use about 1/3 of a red onion, because I find the flavor to be strong after a while. If you dig raw red onion, you can definitely put more in there.
I enjoy colors, so I use half a red bell and half an orange bell with 1 small finely diced jalapeño (seeds and ribs removed). The jalapeño does not add a lot of heat – it’s very mild and my kids enjoyed this salad a number of times without being bothered by it.
Once your veggies are chopped, add them into your big bowl and sprinkle with salt and pepper.
Drain and rinse the kidney beans and black beans
while the rice cooks. If you enjoy other types of beans (like pinto beans
or white beans) you can sub those instead. It’s all about ease!
When the rice is cooked and cooled slightly (not piping hot, but not completely cool) add it right on top of the chopped veggies and squeeze the lime juice over the rice. The rice being warm helps it to absorb the lime flavor easily, and it slightly cooks the veggies. Give it a stir, then add the beans, a big handful of chopped fresh cilantro, and a little extra S&P.

And there you have it! A fresh, colorful salad packed with fiber and protein to go with any lean meat or fish.
I love this salad with some grilled chicken – shrimp, cod, or halibut would be fantastic mains as well.
This salad is fit for a big crowd, or as a make-ahead side to go with your E meals all week long.
Summer is just around the corner, which means two things: 1) less cooking time (because your house it too hot already) and 2) lots of fresh, vibrant flavors. Enter, this beautiful quinoa salad.

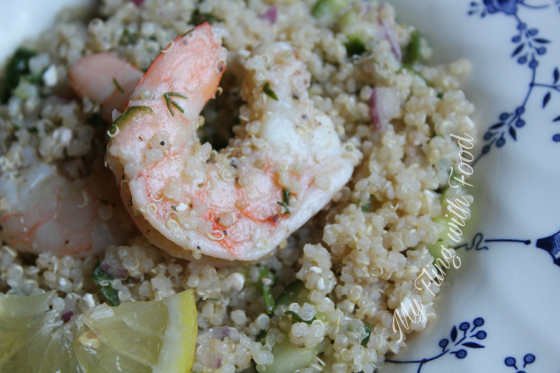
I did roast the shrimp in the oven, but you could also grill them for an even quicker meal.
To roast the shrimp, and stay in E mode, start by preheating your oven to 400. Place the shrimp onto a large baking sheet lined with foil, spray lightly with coconut oil spray
, sprinkle with salt and pepper, and toss to combine. Roast the shrimp at 400 for about 6 minutes – it may be more or less depending on the size and thickness of your shrimp. When they’re done, they will be firm to the touch, pink and opaque on the outside.
All that’s left is to assemble the salad!
Place the cooked quinoa into a large bowl, and add the scallions, dill, parsley, cucumber, red onion, lemon juice, and feta.
For the cucumber, make sure that you take the time (2 seconds, really) to cut out the seeds of the cucumber – yes, even if it’s “seedless”. The seeds have more moisture and will cut the shelf life of your salad significantly. You don’t want the whole batch going bad over some cucumbers! That would just be silly.
To cut the seeds out of your cucumber, slice the cuke lengthwise into quarters and cut into it on an angle so the whole “log” of seeds comes out in one cut.
Give the salad a big toss, taste for seasoning, then add your shrimp and serve.
The great thing about this salad is that it’s wonderful at room temp or cold from the fridge. In fact, as it sits in the fridge the flavor gets even better.
The lemon juice adds a fantastic acidity to the salad, while the herbs add tons of fresh, green flavor. This salad just screams summer to me, and it couldn’t be easier to make!

You will not believe how ridiculously easy (and tasty) this dip is!

During my latest trip to Trader Joe’s, they were displaying the Everything Bagel seasoning along with some other seasonal items, and it jumped out at me. The ingredients are very straightforward: onion, garlic, seasame seeds, salt, and poppyseeds. I had some reduced fat sour cream sitting in my fridge at home waiting for a purpose, and *click* purpose found.

Can a dip really be this easy? YEP.
Mix an entire 16oz container of reduced fat sour cream with about 3 Tablespoons of the Everything Bagel seasoning. If you want to add a little freshness to it, add a fresh herb of your choice: parsley, chives, dill, or scallions. Chop up a few tablespoons, toss it in with your dip and some salt and pepper. That’s it!
Leave it in the fridge for about an hour for the salt crystals to break down and all the flavors have a chance to combine.

This dip is a THM FP up to about 3 Tablespoons (which would be 4.5g of fat). If you’re enjoying this with an E meal, be sure to watch the other fats in your meal to keep within the limits. There were no carbs in my reduced fat sour cream, so if you’re in S mode you can pile on as much as you like (yay!).
Serve with your favorite crudités: zucchini sticks, celery, cucumbers, grape tomatoes, broccoli, cauliflower, mini sweet peppers, Parmesan Whisps or other cheese crackers.
Throw this together before a party or brunch get together, and all your guests will rave! Or, you know, just throw it together for yourself and you’ll have your own little rave. ^_^

This strawberry sauce is not only easy to make, it’s versatile. I’ve used this sauce on top of PB&J pancakes, ice cream, AND I also used it in my upcoming recipes – a no-bake pie and strawberry cupcakes.

My family and I went strawberry picking over the weekend, and we picked 3 gallons of strawberries. 3. GALLONS. I started dreaming up all the strawberry things I could make with all these beautiful, fresh berries: cupcakes, ice cream, pie, cobbler.

Everyone I asked was saying, “Freeze them!” However, I had JUST gotten my big Costco bag of strawberries a week prior, and I have no room in my freezer right now, so that idea was a no-go. Then I had the idea for this strawberry sauce – something that can easily blend into other recipes, and still preserve the strawberries.
The crowning glory was this used a lot of strawberries at once, and took just a little bit of effort.
In a medium sauce pot, combine the cut strawberries, lemon zest and juice, a pinch of salt, and Pyure or THM Gentle Sweet
. I like using lemon with the strawberries because the tart lemon helps break up the sweetness of the berries.

After a few minutes on the heat, the strawberries start to release their juice. The more they cook down, the more juice they release.
When you have an equal amount of juice to berries, sprinkle on the xanthan gum and whisk. Whisking helps to combine the xanthan gum with the strawberry juice, and break up the berries.
Continue cooking on low heat, whisking occasionally until it’s the thickness you desire. When you’re done, it should look similar to this.

You can add a few drops of liquid stevia at the end, if it’s needed, but I found this sauce perfectly sweet.
Spoon the sauce into a pint mason jar and keep in the refrigerator for immediate use, or freeze for later.

Like I said, this sauce wears many hats – it can be a condiment, a filling, or give your baked goods a berry good boost (see what I did there ^_~).


We had a blast picking these strawberries, and we’ll be enjoying them for weeks to come. If you have a strawberry farm near you, get out there and get picking!

This quick gravy has easily become a dinner staple in my house. It’s just as easy to make a big batch for a holiday meal as it is to do 4 servings on a weeknight, and it takes just 5 simple ingredients.

I love this recipe because literally anyone can do this. It doesn’t take a ton of time or skill, and the flavor is always on point. Plus, it can go with ANY meal – who can be mad about that?
This sauce is wonderful with chicken, pork chops or tenderloin, and would even be great over steak.
In my 5-ingredient count, I do not count butter or salt and pepper, as those are pantry items. I do have a few additional flavor options to add freshness and depth, but they aren’t a necessity.
Start by gently sautéing the garlic and shallots together in 1 Tbsp of unsalted butter or coconut oil. Do this on low heat so that the garlic doesn’t burn, and you will only sauté for 2-3 minutes.

Really, who doesn’t love the smell of garlic and shallots cooking away? It’s one of my favorite things. If someone made a candle with that scent, I would be all over it.
Next, add the broth and turn up the heat just a smidge.

Add in the gluten free Worcestershire sauce . This is mainly for salt and to help “brown” the gravy. You could also sub with liquid aminos. Also add the dijon mustard here, if using. I usually add a teaspoon of dijon to my gravy, but this time I didn’t because I was out. Still tasted great, so don’t go out of your way if it’s not a pantry item for you. Sprinkle on the xanthan gum
and whisk. Not much xanthan gum is used here, because it thickens up more with heat and whisking – all it needs is a little time. Don’t be too heavy-handed with it because it will get gummy. Just be patient and whisk.
The mixture will simmer for about 5 minutes and reduce slightly. Keep whisking every other minute until you get the thickness you desire.
Take it off the heat, add the parsley, if you’re using it and serve.

It’s the perfect, light complement to any meal.

For a filling Light S meal, try this with my Easy FP Grilled Asparagus.

I love no-fuss sides that add a fresh complement to any meal – this easy grilled asparagus is definitely one of them.

Asparagus on the grill can be a little frustrating. You don’t want the thicker bottoms to be too raw, and if you cook them longer the tops may burn – UGH. Well, this method will give you perfectly tender, slightly smoky asparagus every time. The best part? You only need 3 ingredients!
Let’s start with the star of this side – the asparagus. When you buy fresh asparagus at the store, make sure you use it within about 2-3 days of purchase. The easiest way to cut off the fibrous stumps is to leave the bottom rubber band on, and cut the whole bunch at once right above that band (about 1-1 1/2 in. from the bottom).

Next, you’re going to quickly blanch the asparagus. Don’t be scared – all blanching means is that you’re going to cook it for a short amount of time, and then shock it really fast to stop the cooking. This ensures that your asparagus will be perfectly al dente all the way through.
You’ll get a pot going with a few inches of water and a big pinch of salt. Doesn’t have to be a lot of water, just enough to submerge the asparagus. Also, make sure that your pot is wide enough to fit the asparagus laying horizontally. While the water comes to a boil, get your shock bowl ready with ice water.
When it boils, drop the asparagus and cook it for 3 minutes (time it!). If you have some asparagus that’s on the thicker side, cook it for 4 minutes.

At the end of 3 minutes, use a wire spider to remove the asparagus from the boiling water, and place it immediately into the prepared ice bath. Let it hang out there for about a minute.

This method keeps your asparagus vibrant green, while also getting it cooked.
Next, heat up a cast iron grill with a spritz of coconut oil spray
. Remove the asparagus to a paper towel to dry off the excess water, then place it onto the hot grill.
It doesn’t need much cooking, just until it has some grill marks on each side (you don’t want it looking like a limp noodle though).
Take it off the grill, place it onto a plate, and lightly season with salt and pepper.
Lightly zest a lemon. I like using this easy grip zester because it gives the long, pretty curls of zest. If all you have is a regular microplane
or zester, that’s fine too.

Throw some of that zest right over the warm asparagus, and finish with a light sprinkle of Parmesan or Pecorino Romano cheese. Of course, if you’re paleo or dairy free, just leave the cheese off.

This is a light, zesty, fresh (and fast!) vegetable side that can literally go with anything. My husband’s favorite side is asparagus, and he raved about how perfectly cooked this was. He even ate the asparagus bottoms, whereas he’s normally a strict upper-half-only guy.

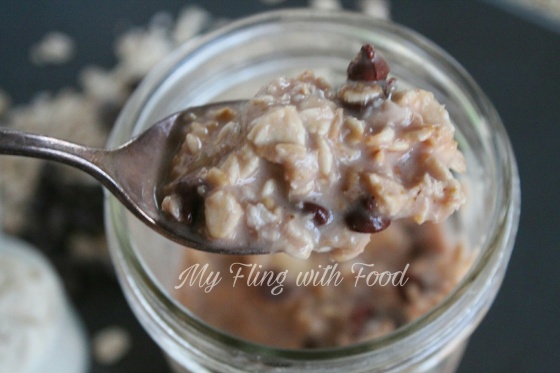
These Brownie Batter oats are so rich and chocolatey, you won’t believe they’re an E!

I’m a chocoholic, I admit it. If I have a dessert choice, it will almost always include chocolate in some form. Honestly, chocolate is good any time – breakfast, lunch, snacks, or dessert. These oats are so decadent, you could enjoy them as a filling E dessert and not feel like you’re missing any richness.

The prep for overnight oats could not be easier – combine the oats, unsweetened vanilla almond milk
, whey protein isolate
, Pyure
or THM Gentle Sweet
, vanilla
, Lily’s chocolate chips
, unsweetened cocoa powder
, and salt
in a wide mouth mason jar
with a small spatula
. Pop a lid on it, then set it in the fridge for at least one hour, or overnight. You could even make this up to 5 days in advance, if you’re looking for a grab-and-go snack, breakfast, or dessert. I prefer the wide mouth jars for these overnight oatmeals because it’s a little easier to get the ingredients into the jar and really get them combined, however you could use anything that will hold the ingredients and has a lid.
Once the oats have a chance to soak and become soft, the chocolate chips actually break down slightly and almost create this pudding-like thickness. I enjoyed these as an afternoon snack, and I really felt like I was eating a completely rich pudding or sinful chocolate dessert.
These oats are so versatile, they could pass for breakfast, an afternoon snack, or a protein-packed E dessert. And, really, who doesn’t want a decadent chocolate grab-and-go meal?

Another fresh, flavorful overnight oats recipe is coming your way!

Blueberries are one of my favorite fruits to have in the morning. However, blueberries by themselves day after day can feel a little redundant. So, in my efforts to welcome Spring (back) to Georgia (because the weather this week has not been Spring-y, AT ALL) I combined my favored blueberries with fresh, zesty lemon.
The blueberry-lemon combo is incredibly refreshing and light – it’s almost like blueberries with a splash of sunshine. Just the thing to get you energized for the day ahead!

The preparation is exceedingly quick and easy – assemble the oats, unsweetened vanilla almond milk
, whey protein isolate
, vanilla
, Pyure
or THM Gentle Sweet
, salt
, chia seeds
, frozen blueberries, and the zest (plus a small squeeze of juice, if you like) of 1 small lemon in a wide mouth mason jar
and stir it together with a small spatula
. Pop a lid on it and place it in the fridge, then forget about it for at least an hour or overnight. You can even prep multiple versions of these using my other overnight oats recipes days in advance for your weekday mornings. With a full scoop of whey protein isolate
, these oats are a meal unto themselves. However, if you need some help feeling full you could enjoy them with some egg whites or other E-friendly proteins.
I used chia seeds in this recipe because it had virtually zero fat (which is great for an E), and I wanted to add a superfood element. Chia seeds
are rich in omega-3s, and get slightly gelatinous when they’re soaked. I used a scant Tablespoon in this recipe, which only added about 3-3.5g of fat. Of course, they aren’t vital, so you could leave them out if you don’t have them on hand. You could also add a dollop of fat free Greek yogurt or cottage cheese for a little creaminess.

In the morning, you have these beautifully creamy oats with soft blueberries and a little pop of freshness from the lemon and chia seeds. If you need a recipe to get your rear in gear in the mornings, this is the one!
I am so excited to share these overnight oats recipes with you! They’re a fantastic (and EASY) make-ahead E breakfast. It’s perfect for those rushed mornings on-the-go.

Chunky Monkey is my favorite ice cream flavor combination of all time. If you’re unfamiliar with it, it’s banana ice cream with dark chocolate chunks and walnut pieces. Can’t really have the walnut pieces with this, unless you want to make it a crossover, but with the help of Lily’s chocolate chips I can have the chocolate-banana combo. [Side note: I will make a low carb chunky monkey ice cream one day – count on it.] A serving size of Lily’s chocolate chips
is about 60 chips, which I figured out (through counting tiny chips) is roughly 2 Tablespoons (and has only 4.5g of fat at the full serving, perfect for an E). I only used one Tablespoon in this recipe, and it was plenty chocolatey.

These oats took me just 5 minutes to prep (and I prepped 4 at once!), and they use simple ingredients – nothing crazy here. The only prep involved is to place all of the ingredients into a wide mouth mason jar, or something similar, and stir until combined. I like the wide mouth jars for this, because it’s easier to get down into the jar with a small spatula
to stir everything together. Of course, the jars all come with their own lids making storage a breeze.
The oats have to be in the fridge for at least an hour, but you can prep a few days worth at a time, up to about 5 days.
Place the oats into the jar, then follow with vanilla
, salt
, whey protein isolate
, unsweetened vanilla almond milk
, Pyure
or THM Gentle Sweet
, mashed banana, and Lily’s chocolate chips
. Stir to combine, then set in the fridge for at least one hour.

Then in the morning, you have these perfectly softened, creamy oats with chunks of banana and rich chocolate chips. These oats, coupled with a big cup of collagen green tea, were the perfect light, yet filling breakfast before heading off to the gym.