Southwestern Rice & Bean Salad (THM E)

I started making this salad when my husband and I went vegan a few years ago, and all but forgot about it until recently.  It’s a summer favorite because it can be enjoyed warm or cold, and it requires minimal cooking.

PicsArt_06-15-10.31.54.png

This salad is mostly raw/no-cook – the only component that requires cooking is the rice. You can use leftover brown rice, or you can cook it fresh. I prefer to cook the rice fresh, because I think the lime flavor soaks best into warm rice as opposed to chilled.

I start by chopping the peppers and onion, and placing it into the bottom of a large mixing bowl.

20170522023350_IMG_3306

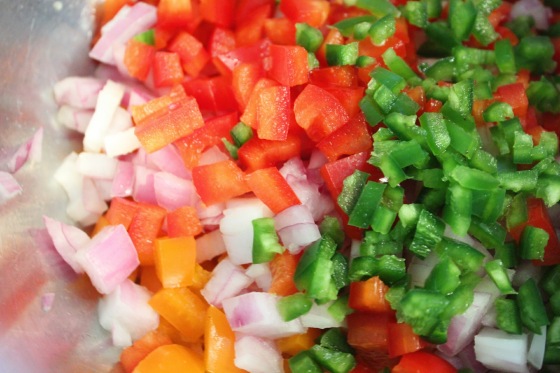
I use about 1/3 of a red onion, because I find the flavor to be strong after a while. If you dig raw red onion, you can definitely put more in there.

I enjoy colors, so I use half a red bell and half an orange bell with 1 small finely diced jalapeño (seeds and ribs removed). The jalapeño  does not add a lot of heat – it’s very mild and my kids enjoyed this salad a number of times without being bothered by it.

Once your veggies are chopped, add them into your big bowl and sprinkle with salt and pepper.

Drain and rinse the kidney beans and black beans while the rice cooks. If you enjoy other types of beans (like pinto beans or white beans) you can sub those instead. It’s all about ease!

When the rice is cooked and cooled slightly (not piping hot, but not completely cool) add it right on top of the chopped veggies and squeeze the lime juice over the rice. The rice being warm helps it to absorb the lime flavor easily, and it slightly cooks the veggies. Give it a stir, then add the beans, a big handful  of chopped fresh cilantro, and a little extra S&P.

PicsArt_06-15-10.35.44

And there you have it! A fresh, colorful salad packed with fiber and protein to go with any lean meat or fish.

I love this salad with some grilled chicken – shrimp, cod, or halibut would be fantastic mains as well.

This salad is fit for a big crowd, or as a make-ahead side to go with your E meals all week long.

This post contains affiliate links, which means I receive a commission off of purchases made using these links. If you’re interested in fitness, the Trim Healthy Mama lifestyle, or just living a more healthy life, please consider using one or more of the links below. The money made helps me feed my growing family and keeps this blog running with free recipes. Thank you!

Southwestern Rice & Bean Salad (THM E)

  • Servings: 8-10
  • Difficulty: Easy
  • Print


Credit: Erin Murray, My Fling with Food

Ingredients

  • 1/3 medium red onion, finely diced
  • 1/2 red bell pepper, diced
  • 1/2 orange bell pepper, diced
  • 1 small jalapeño, minced (seeds and ribs removed for a mild heat)
  • juice of 2 limes
  • 1 1/2 c cooked brown rice
  • 15oz can black beans, drained and rinsed
  • 15oz can kidney beans or pinto beans, drained and rinsed
  • 1 big handful of fresh chopped cilantro
  • salt and pepper

Directions

  1. Begin cooking the brown rice.
  2. Add the peppers and onion to the bottom of a large mixing bowl, and season with salt and pepper.
  3. When the rice is cooked and warm, add it on top of the vegetables and squeeze the lime juice over top. Give it a big toss.
  4. Add the drained and rinsed beans, cilantro, and a little more S&P then toss again.
  5. Serve at room temperature or chilled alongside any lean protein. Store in the fridge for up to one week.

Easy Greek Tzatziki (THM FP)

Tzatziki is incredibly versatile. Use it as a topping for a burger, salad, or as a dip for meat and veggies. The good news is, it’s also easy to make.

PicsArt_06-15-10.21.26

Tzatziki is refreshing and takes just minutes to make.

I always used 0% fat plain Greek yogurt in my recipe, because you can use it with any THM meal.

For the cucumbers, I like to use hothouse cucumbers as they usually have less water than others. I lightly skin them, cut out the seeds, and finely dice.

Next, zest and juice the lemon. Add the parsley, dill, salt, and pepper and you’re done! Refrigerate for about 30 minutes prior to enjoying, so that the flavors have a chance to come together.

PicsArt_06-15-10.25.07

It is so creamy and delicious! The yogurt has a tang, while the lemon delivers a punch of freshness. The cucumbers are crunchy and refreshing. And the herbs tie it all together with brightness.

It’s perfect on salads, burgers, as an appetizer dipper, or as a sauce for meat and fish.

This post contains affiliate links, which means I receive a commission off of purchases made using these links. If you’re interested in fitness, the Trim Healthy Mama lifestyle, or just living a more healthy life, please consider using one or more of the links below. The money made helps me feed my growing family and keeps this blog running with free recipes. Thank you!

Greek Tzatziki (THM FP)

  • Servings: Makes 1/2 cups
  • Difficulty: Easy
  • Print


Credit: Erin Murray, My Fling with Food

Ingredients


– 1 1/4 c nonfat plain Greek yogurt
– 1/3 c finely diced hothouse cucumber
– zest and juice of 1 lemon
– 3 Tbsp chopped fresh parsley
– 1 Tbsp chopped fresh dill
– salt and pepper

Directions

  1. Combine all ingredients in a small bowl and refrigerate for at least 30 minutes before serving.
  2. Store in the fridge for up to 1 week.

Low Carb Shrimp & Grits (THM S)

Shrimp and grits is one of my favorite summertime throw-together meals. It comes together quickly, uses simple ingredients, and has all the scrumptiousness of something that takes all day to cook.

PicsArt_06-15-09.59.13.png

For this meal, start with simmering the vegetable mixture. It takes a few minutes for the flavors to develop and reduce slightly.

Next, start crisping the bacon – trust me, you don’t want to skip it. That crispy bacon topping is EVER-Y-THANG.

Steam the cauli grits next.

And finish by sautéing the shrimp in the same pan where you cooked the bacon. The bacon drippings help get a nice, fried char on the shrimp.

Finish up the cauli grits, and you’re done!

Plate it by heaping a big pile of grits into a bowl, followed by the pepper and tomato mixture, then a few shrimp, and throw on some crispy bacon.

PicsArt_06-15-10.04.34

The grits provide a creamy pillow for the veggies, then the shrimp and bacon provide a crispy, slightly smoky bite.

I make this often during the summer months because it’s easy and kids and adults alike will gulp it down.

This post contains affiliate links, which means I receive a commission off of purchases made using these links. If you’re interested in fitness, the Trim Healthy Mama lifestyle, or just living a more healthy life, please consider using one or more of the links below. The money made helps me feed my growing family and keeps this blog running with free recipes. Thank you!

Shrimp and Grits (THM S)

  • Servings: 5
  • Difficulty: Easy
  • Print


Credit: Erin Murray, My Fling with Food

Ingredients

  • 1 1/2lbs jumbo shrimp, peeled and deveined with tails removed
  • 6 strips bacon, sliced
  • 1 green bell pepper, diced
  • 1 medium red onion, diced
  • 1 large stalk celery, diced
  • 2 cloves garlic, minced
  • 1 15oz can diced seasoned fire roasted tomatoes (the ones seasoned with garlic and onion)
  • 1 bay leaf
  • hot sauce to taste (optional)
  • 1 tsp gluten free Worcestershire sauce
  • 1 – 1 1/2 tsp Cajun seasoning
  • salt and pepper
  • Creamy Cauli Grits

Directions

  1. Heat a medium sauce pan over medium-low heat with the onions, peppers, garlic, and celery. Sauté until tender, about 6 minutes.
  2. Add the bay leaf, Worcestershire, tomatoes, and hot sauce (if using). Bring to a boil and reduce to a simmer for about 10-12 minutes. Mixture should be softened, and slightly thick.
  3. Begin the steaming the cauli rice.
  4. Crisp the bacon in a separate, large skillet. Remove to a paper towel once crisp.
  5. Toss the shrimp in a medium-sized bowl with about a teaspoon of Cajun seasoning.
  6. Fry the shrimp in the same pan where you cooked the bacon. Cook for about 1 minute on each side, depending on size and thickness. Remove to a plate.
  7. Finish the cauli grits and serve!

Creamy Cauli Grits (THM S)

Let me tell you about one of my new favorite sides – cauliflower grits!

PicsArt_06-02-05.10.56

Cauliflower is a super food that can take on many roles – mashed cauliflower, roasted cauliflower, cauliflower steaks, and dairy free Alfredo sauce, just to name a few.

I’ve tried these grits a few times, but this recipe really hit it out of the park. They were creamy, flavorful, and a perfect breakfast or dinner pairing. This recipe actually went with my Southern-Style Shrimp and Grits, but I also ate the leftovers as a lovely breakfast side a few days later.

PicsArt_06-02-05.17.53

The best part is that these come together in under 10 minutes, and all you need is a microwave and a food processor.

Start by roughly chopping a small head of raw cauliflower. Toss it all into your food processor, and pulse until it’s finely minced. [Do not rinse out the raw cauli bits after pulsing. It helps add texture to your grits, so leave ’em.

Place the minced cauliflower into a microwave-safe bowl and cover with heat-safe plastic wrap. No water, nothing added to the cauliflower – just cover it. Throw it into the microwave on high for 6-7 minutes. My microwave is aging, so it generally takes longer whereas newer microwaves will take less time to cook the cauliflower. It won’t be completely soft – it will still have an al dente “bite” to it, but that’s what you want!

Carefully peel back the plastic, then place the (hot!) cauliflower back into your food processor (with the raw bits), add the butter, nutritional yeast, cream cheese, cheddar cheese, a few shakes of hot sauce, and the cream/half and half. Pulse a few more times until the grits are creamy and all the ingredients are incorporated. Season liberally with salt and pepper, and serve right away.

PicsArt_06-02-05.15.50

You won’t believe how easy it is to make these cauli grits. It’s one of those low-maintenance sides you can throw together in minutes while your main dish simmers.

PicsArt_06-02-05.20.36

And can we talk about TASTY?! The texture alone was just dreamy. You hear cauli grits and think, “OK, just more cauliflower mush.” NOPE. They have texture and depth of flavor – you get a little heat from the hot pepper sauce and creaminess from the butter, cream cheese, and sharp cheddar – it’s the perfect balance.

Try these with your low carb breakfast or for dinner (Shrimp and Grits, HAY). They’re perfect any time!

This post contains affiliate links, which means I receive a commission off of purchases made using these links. If you’re interested in fitness, the Trim Healthy Mama lifestyle, or just living a more healthy life, please consider using one or more of the links below. The money made helps me feed my growing family and keeps this blog running with free recipes. Thank you!

Creamy Cauli Grits (THM S)

  • Servings: 4-6
  • Difficulty: Easy
  • Print


Credit: Erin Murray, My Fling with Food

Ingredients

  • 1 small head of cauliflower, roughly chopped
  • 1/3 c grated sharp cheddar cheese (bagged or fresh grated is fine)
  • 3 Tbsp nutritional yeast
  • 2oz cream cheese
  • 3 Tbsp unsalted butter
  • 2-3 Tbsp heavy cream or half and half
  • 8-10 dashes hot sauce
  • salt and pepper

Directions

  1. Add the raw cauliflower to a food processor and pulse until finely minced.
  2. Place into a microwave-safe bowl, cover with plastic wrap, and microwave on high for 7-8 minutes. (Newer microwaves start on the lower time. Don’t rinse the raw bits of cauliflower out of your food processor.)
  3. Carefully remove the plastic and place the hot cauliflower back into the food processor.
  4. Add the remaining ingredients and pulse to combine. Taste for seasoning, and adjust as needed. Serve immediately.

Mediterranean Stuffed Mushrooms (THM FP/S)

This warm weather down in Georgia has me cooking up all of the fresh veggies and flavors of summer. These stuffed mushrooms are a tasty side for the family or an impressive appetizer for a whole party.

PicsArt_05-02-11.13.29

These stuffed mushrooms are so easy and flavorful, it’s going to blow your mind.

Start by mincing the tomato, shallot, garlic, and parsley. Season the vegetable mix with the juice of half a lemon, salt and pepper.

20170424060145_IMG_3164

For more of a FP side, add just 1 Tbsp of crumbled feta. For an S, add 2 Tbsp of feta.

Remove the stems of your mushrooms and place them cap-side down on a baking sheet.

20170424060154_IMG_3165

Fill each cap with about a teaspoon of filling. Some will be more or less, based on their size – just pack as much in there as you can, and fill them to the top of the cap.

20170424060935_IMG_3167

Bake at 350 for about 30 minutes. The mushrooms will be softened, but still able to hold their shape.

While they’re still hot, sprinkle with a little bit of parmesan and serve immediately.

PicsArt_05-02-11.15.14

The mushrooms are hearty, while the filling is delicate, zesty, and light.

These are perfect to go alongside some grilled protein, or as a fresh appetizer for a holiday party.

This post contains affiliate links, which means I receive a commission off of purchases made using these links. If you’re interested in fitness, the Trim Healthy Mama lifestyle, or just living a more healthy life, please consider using one or more of the links below. The money made helps me feed my growing family and keeps this blog running with free recipes. Thank you!

Mediterranean Stuffed Mushrooms (THM FP/S)

  • Servings: Multiple
  • Difficulty: Easy
  • Print


Credit: Erin Murray, My Fling with Food

Ingredients

  • 16oz whole cremini mushrooms
  • 1 Roma tomato, seeded and finely diced
  • 1 shallot, minced
  • 1 large clove garlic, minced
  • juice of 1/2 lemon
  • 1 1/2 Tbsp fresh parsley
  • 1-2 Tbsp crumbled feta* (See Notes)
  • salt and pepper
  • Optional garnish: more fresh parsley, grated parmesan

Directions

  1. Preheat oven to 350.
  2. In a small bowl, combine the tomatoes, shallot, garlic, parsley, lemon, and feta. Season with salt and pepper.
  3. Gently remove the stems from each mushroom, and place them cap-side down on a large baking sheet.
  4. Fill each cap with about a teaspoon of filling. Fill each cap to the brim, as the mushrooms and filling will cook down slightly.
  5. Bake at 350 for about 30 minutes. The mushrooms should be softened, but still able to hold their shape.
  6. While they’re still warm, sprinkle with Parmesan, if using. Serve immediately.
  7. *NOTES: For a FP, use just 1 Tbsp of feta. For an S, use 2 Tbsp.

Low Carb Ranch Pasta Salad (THM S)

This post contains affiliate links, which means I receive a commission off of purchases made using these links. If you’re interested in fitness, the Trim Healthy Mama lifestyle, or just living a more healthy life, please consider using one or more of the links below. The money made helps me feed my growing family and keeps this blog running with free recipes. Thank you!

This pasta salad is a quick and easy side dish to make ahead for lunch or dinner – perfect for those busy weeknights!

PicsArt_04-17-11.40.46

If you’ve ever been to a Ruby Tuesdays, you very likely know the pasta salad I’m talking about. Creamy, crunchy, and a little salty from the ham and Ranch.

Growing up in Woodstock, Georgia (which was very small then) Ruby Tuesdays was one of the only sit-down restaurants in our area. When my parents felt like treating us to a dinner out, we usually went there or our favorite Mexican food joint.

My mother loves to tell stories about what a veggie lover I’ve always been (apparently, I used to ask for a breakfast of carrots, celery, and ranch – who’d have guessed?!). So naturally I gravitated toward the salad bar and piled it high. The pasta salad became one of my favorites very quickly.

I haven’t been to Ruby Tuesdays in forever! The last memory I have of going there, I was pregnant with my daughter (which was 5 years ago). So, you can understand my excitement when I found this pasta salad EVEN BETTER than the one at the favored restaurant chain.

PicsArt_04-18-02.44.23

It’s a fantastic use of leftover ham, veggies sitting in the fridge, or those last few Tablespoons of Ranch at the bottom of your jar.

My kids were digging this pasta salad too, even the veggies (that they normally shy away from).

PicsArt_04-18-02.53.15

This salad is creamy, delightfully crunchy, and FRESH. Just look at all those flecks of fresh herbs from the homemade Ranch dressing – gorgeous!

Ranch Pasta Salad (THM S)

  • Servings: 6-8
  • Difficulty: Easy
  • Print


Credit: Erin Murray, My Fling with Food

Ingredients

  • 8oz Dreamfields Pasta (any short cut variety, I used elbows), cooked (makes about 2 cups cooked pasta)
  • 1 1/2 c finely diced ham
  • 1/3 c frozen peas (don’t worry about thawing or cooking, they thaw very quickly)
  • 1/2 green bell pepper, finely diced
  • 2 Tbsp mayonnaise
  • 2-3 heaping Tbsp Homemade Ranch Dressing
  • salt and pepper

Directions

  1. Combine all ingredients in a large bowl. Cover and refrigerate for 1 hour, and add more mayo and/or ranch if the salad gets too dry.
  2. Store refrigerated for up to 2 weeks.

Low Carb Blender Ranch Dressing (THM S)

This post contains affiliate links, which means I receive a commission off of purchases made using these links. If you’re interested in fitness, the Trim Healthy Mama lifestyle, or just living a more healthy life, please consider using one or more of the links below. The money made helps me feed my growing family and keeps this blog running with free recipes. Thank you!

This homemade ranch dressing is so easy to make, you’ll never want to buy bottled again!
PicsArt_04-09-10.59.12.png
What if I told you homemade ranch was just a turn of your blender away? Well, brace yourselves, because it’s true!

This ranch batch blended beautifully in my Ninja blender, and it only took a few minutes.

This recipe makes about 1 1/2 cups of salad dressing, however you can stretch it a little further. My dressing tends to thicken after refrigeration, and the flavor will intensify, so you can thin it out with a little half and half, almond milk, or water if you prefer.

My kids love this dressing with literally anything – cut veggies, salad (yes, they eat salad ^_^), nuggets, pizza, you name it. I love this dressing because I get to control the quality of ingredients, and because it tastes incredible. [Seriously, it’s better than those $5 bottles of organic dressing at the grocery store. AND IT DOESN’T COST YOU $5 A BATCH.]

Blender Ranch Dressing (THM S)

  • Servings: Multiple
  • Difficulty: Easy
  • Print


Credit: Erin Murray, My Fling with Food

Ingredients

  • 1 c mayonnaise
  • 1/2 c sour cream (full fat is fine. I used reduced fat, because it had slightly fewer carbs than full fat)
  • 1/2 small bunch fresh parsley
  • 1/2 small bunch fresh chives, roughly chopped
  • 1/4 c fresh dill
  • 2 small cloves garlic, roughly chopped
  • 2 tsp white balsamic vinegar
  • 5 dashes hot sauce
  • salt and pepper
  • half and half or plain, unsweetened almond milk to thin, optional

Directions

  1. Place all ingredients into a high-powered blender and blend well. Adjust the seasoning as needed, and thin with half and half or almond milk if desired.
  2. Place into a pint mason jar and refrigerate for at least 2 hours before use. Keeps in the fridge for up to 2 weeks.

Chorizo & Veggie Egg Bake (THM S)

This post contains affiliate links, which means I receive a commission off of purchases made using these links. If you’re interested in fitness, the Trim Healthy Mama lifestyle, or just living a more healthy life, please consider using one or more of the links below. The money made helps me feed my growing family and keeps this blog running with free recipes. Thank you!

I love when I can make a large, family-style breakfast without a whole bunch of effort. This chorizo-egg bake is great for breakfast, brunch, lunch, or dinner (BBLD) and it’s a crowd pleaser.

PicsArt_04-08-10.49.12

Chorizo is my husband’s favorite, and sometimes I like for breakfast to have a little kick. It’s a spiced Mexican sausage you can find in bulk, or in casing. I like buying my sausage in bulk, so I have more choices as to its use. If you like something more mild, regular breakfast sausage will do just fine.

This is a great make ahead meal – I actually browned the sausage and veggies the night before, so the next morning all I had to do was heat up the oven and plop some eggs on top.

Usually I’ll make something like this as a frittata or casserole, but I enjoyed doing the baked whole eggs because it cooked a lot of eggs at once, and I still got to have runny yolks (which are my FAVORITE). You could also do this in individual ramekins using the same method.

Brown the sausage, zucchini, radishes, and bell pepper together in a big skillet until the sausage is cooked through. Stir in the black beans, then transfer to a baking dish and cool slightly.

20170401195726_IMG_2988

Make valleys in the meat mixture with the back of a spoon, so the eggs have a place to sit.

20170401195827_IMG_2989

Place the eggs on top and season with a little salt and pepper.

20170401200157_IMG_2992

Bake at 400 for about 25 minutes, or until the egg whites are set.

20170401204043_IMG_2994

Nom!

I served this over some chopped rainbow tomatoes and sliced avocados, but there are many more possibilities. Top with fresh pico de gallo, guacamole, sour cream, cheese, or any other S-friendly topper your mind can dream up.

20170401202048_IMG_2993

Top with some fresh chopped cilantro, and you’re ready to serve!

PicsArt_04-08-10.54.16

My favorite part about this whole meal…

PicsArt_04-08-11.05.41

That beautiful, runny yolk coating the sausage and veggies, making its own little sauce.

The sausage lends a little spice, while you get some crunch with the veggies, and the fresh avocado cools it all down.

This egg bake will please the whole family!

Chorizo and Veggie Egg Bake (THM S)

  • Servings: 6
  • Difficulty: Easy
  • Print


Credit: Erin Murray, My Fling with Food

Ingredients

  • 1lb bulk chorizo sausage (or other breakfast sausage)
  • 1 medium zucchini, diced
  • 1/2 bunch radishes, diced
  • 1/2 bell pepper, diced
  • 1 c black beans, drained and rinsed (sub cubed sweet potatoes for paleo, or additional vegetable)
  • 1/2 Tbsp smoked paprika
  • 1 Tbsp ground coriander
  • few dashes of hot sauce
  • 6 eggs (or one egg per person)
  • fresh chopped cilantro
  • Toppings of choice: pico de gallo, sour cream, cheese, avocado, etc.
  • salt and pepper

Directions

  1. Preheat oven to 400.
  2. Brown the sausage and veggies with the paprika and coriander in a large skillet until sausage is cooked through and veggies are tender.
  3. Add the meat to one large, or several individual, baking dishes and make valleys in the meat mixture with the back of a spoon. Add the eggs in the valleys, and season with salt and pepper.
  4. Bake at 400 for about 25 minutes, or until egg whites are set.
  5. Top with fresh cilantro and serve immediately with toppings of choice.

Supreme Pizza Stuffed Zucchini Boats (THM S)

This post contains affiliate links, which means I receive a commission off of purchases made using these links. If you’re interested in fitness, the Trim Healthy Mama lifestyle, or just living a more healthy life, please consider using one or more of the links below. The money made helps me feed my growing family and keeps this blog running with free recipes. Thank you!

Pizza night is easily my favorite night. The kids don’t complain. The husband doesn’t complain. Imagine my surprise when I traded our usual fathead pizza crust for zucchini, and STILL had a happy crowd. (Angels sang, trust me.)

PicsArt_04-07-03.08.39

Believe me when I say how much I love pizza made with fathead dough, but I don’t always want my meals to be so calorie-dense. Plus, having a lot of dairy at once can feel really heavy, whereas the zucchini makes your meal lighter (and adds veggies!).

The supreme pizza ingredients I chose were pepperoni, hot Italian sausage, sliced mushrooms, and diced green bell peppers. If you like a different combination – use it! I found this to be very tasty, and I’m sure you will too.

Start by cutting the tops off your zucchini, slicing in half lengthwise, and scooping out the middle/seeds. This is the part of the zucchini that’s heavy with water, you want to remove it so that your pizza isn’t watery. And, obviously, you need a place for those yummy toppings to go!

20170328072804_IMG_2945

It was easy to carve these boats with a mini ice cream scoop. It gave me a nice, round shape, and I could really dig in to the zucchini to create a deep boat.

Next arrange them in your dish. I got the most bang for my buck by alternating the tops and bottoms, like so. [My 9×13 baking dish was perfect for 7-8 zucchini boats.]

20170328073208_IMG_2946

Next, salt and pepper your boats, then paint the inside with marinara sauce (store bought or homemade).

Now it’s time to pile in the toppings! I did cooked crumbled sausage on the bottom, then mushrooms and bell peppers, a layer of cheese,  topped with pepperoni, and piled on more cheese and seasoning.

I like hugging the pepperoni with cheese because 1) it helps the ingredients stick together and 2) I love crispy pepperoni. I used both mozzarella and Romano cheese for the topping, because I like the differing flavors. I also sprinkled the tops with a little dried Italian seasoning, for an extra flavor boost.

Pop the boats into a 375 degree oven, covered with foil, for about 25 minutes. Remove the foil and continue cooking (or broil on low, like I did for crispy pepperoni) until the tops are browned and bubbly.

PicsArt_04-07-03.16.09

Mmm, look at those beautifully brown tops!

PicsArt_04-07-03.11.05

These boats were a fantastic, light and filling dinner. I wanted to add even more green to my plate, so I enjoyed two with a side salad. My kids enjoyed their boats minus the spicy sausage. My husband (zucchini hater extraordinaire) had three. THREE! I almost died of shock.

This meal was so fresh and easy, it almost felt illegal (ha!). I hope your family enjoys these as much as mine!

Supreme Pizza Stuffed Zucchini (THM S)

  • Servings: 4+
  • Difficulty: Easy
  • Print


Credit: Erin Murray, My Fling with Food

Ingredients

  • 4 medium zucchini (for more than 4 people, add 1 whole zucchini per person)
  • marinara sauce
  • 1/2 lb of mild or hot Italian sausage
  • 1/4 lb of sliced pepperoni
  • 1/2 c sliced mushrooms
  • 1/2 green bell pepper, finely diced
  • mozzarella and Romano cheese
  • dried Italian seasoning
  • salt and pepper

Directions

  1. Preheat oven to 375.
  2. Cut the tops off the zucchini, halve lengthwise, and carve out the middles.
  3. Season the boats with salt and pepper and paint the insides with marinara.
  4. Arrange the toppings: sausage on the bottom, peppers and mushrooms, mozzarella, pepperoni, more mozzarella, Romano cheese, and a sprinkle of dried Italian seasoning.
  5. Cover with foil, and bake for about 25 minutes.
  6. Remove the foil, and continue baking (or broil on low) until the tops are browned and bubbly.

Easy Grilled Asparagus (THM FP)

This post contains affiliate links, which means I receive a commission off of purchases made using these links. If you’re interested in fitness, the Trim Healthy Mama lifestyle, or just living a more healthy life, please consider using one or more of the links below. The money made helps me feed my growing family and keeps this blog running with free recipes. Thank you!

I love no-fuss sides that add a fresh complement to any meal – this easy grilled asparagus is definitely one of them.

PicsArt_03-27-02.47.14.jpg

Asparagus on the grill can be a little frustrating. You don’t want the thicker bottoms to be too raw, and if you cook them longer the tops may burn – UGH. Well, this method will give you perfectly tender, slightly smoky asparagus every time. The best part? You only need 3 ingredients!

Let’s start with the star of this side – the asparagus. When you buy fresh asparagus at the store, make sure you use it within about 2-3 days of purchase. The easiest way to cut off the fibrous stumps is to leave the bottom rubber band on, and cut the whole bunch at once right above that band (about 1-1 1/2 in. from the bottom).

20170320063334_IMG_2879

Next, you’re going to quickly blanch the asparagus. Don’t be scared – all blanching means is that you’re going to cook it for a short amount of time, and then shock it really fast to stop the cooking. This ensures that your asparagus will be perfectly al dente all the way through.

You’ll get a pot going with a few inches of water and a big pinch of salt. Doesn’t have to be a lot of water, just enough to submerge the asparagus. Also, make sure that your pot is wide enough to fit the asparagus laying horizontally. While the water comes to a boil, get your shock bowl ready with ice water.

When it boils, drop the asparagus and cook it for 3 minutes (time it!). If you have some asparagus that’s on the thicker side, cook it for 4 minutes.

20170320064002_IMG_2887

At the end of 3 minutes, use a wire spider to remove the asparagus from the boiling water, and place it immediately into the prepared ice bath. Let it hang out there for about a minute.

20170320064143_IMG_2889

This method keeps your asparagus vibrant green, while also getting it cooked.

Next, heat up a cast iron grill with a spritz of coconut oil spray. Remove the asparagus to a paper towel to dry off the excess water, then place it onto the hot grill.

It doesn’t need much cooking, just until it has some grill marks on each side (you don’t want it looking like a limp noodle though).

Take it off the grill, place it onto a plate, and lightly season with salt and pepper.

Lightly zest a lemon. I like using this easy grip zester because it gives the long, pretty curls of zest. If all you have is a regular microplane or zester, that’s fine too.

20170320063602_IMG_2880

Throw some of that zest right over the warm asparagus, and finish with a light sprinkle of Parmesan or Pecorino Romano cheese. Of course, if you’re paleo or dairy free, just leave the cheese off.

PicsArt_03-27-02.51.23

This is a light, zesty, fresh (and fast!) vegetable side that can literally go with anything. My husband’s favorite side is asparagus, and he raved about how perfectly cooked this was. He even ate the asparagus bottoms, whereas he’s normally a strict upper-half-only guy.

Easy Grilled Asparagus (THM FP)

  • Servings: 4
  • Difficulty: Easy
  • Print


Credit: Erin Murray, My Fling with Food

Ingredients

  • 1 bunch fresh asparagus
  • zest of 1 lemon
  • light sprinkle of Parmesan or Pecorino Romano cheese, optional
  • salt and pepper
  • coconut oil spray

Directions

  1. Bring a pot with salted water up to a boil. Also prepare a large bowl with ice water off to the side.
  2. Boil the asparagus for exactly 3 minutes, remove with a wire spider, and place directly into a prepared ice bath. Leave the asparagus in the ice bath for about 1 minute. Remove and pat dry.
  3. Heat a grill pan with a spritz of coconut oil. Place the asparagus onto the hot grill and grill it for about 2 minutes.
  4. Place the grilled asparagus onto a plate. Season lightly with salt and pepper, lemon zest, and a sprinkle of cheese.