Roasted Shrimp & Feta Quinoa (THM E)

Summer is just around the corner, which means two things: 1) less cooking time (because your house it too hot already) and 2) lots of fresh, vibrant flavors. Enter, this beautiful quinoa salad.

PicsArt_05-17-01.20.30

I did roast the shrimp in the oven, but you could also grill them for an even quicker meal.

To roast the shrimp, and stay in E mode, start by preheating your oven to 400. Place the shrimp onto a large baking sheet lined with foil, spray lightly with coconut oil spray, sprinkle with salt and pepper, and toss to combine. Roast the shrimp at 400 for about 6 minutes – it may be more or less depending on the size and thickness of your shrimp. When they’re done, they will be firm to the touch, pink and opaque on the outside.

All that’s left is to assemble the salad!

Place the cooked quinoa into a large bowl, and add the scallions, dill, parsley, cucumber, red onion, lemon juice, and feta.

For the cucumber, make sure that you take the time (2 seconds, really) to cut out the seeds of the cucumber – yes, even if it’s “seedless”. The seeds have more moisture and will cut the shelf life of your salad significantly. You don’t want the whole batch going bad over some cucumbers! That would just be silly.

To cut the seeds out of your cucumber, slice the cuke lengthwise into quarters and cut into it on an angle so the whole “log” of seeds comes out in one cut.

Give the salad a big toss, taste for seasoning, then add your shrimp and serve.

PicsArt_05-17-01.23.05

The great thing about this salad is that it’s wonderful at room temp or cold from the fridge. In fact, as it sits in the fridge the flavor gets even better.

The lemon juice adds a fantastic  acidity to the salad, while the herbs add tons of fresh, green flavor. This salad just screams summer to me, and it couldn’t be easier to make!

This post contains affiliate links, which means I receive a commission off of purchases made using these links. If you’re interested in fitness, the Trim Healthy Mama lifestyle, or just living a more healthy life, please consider using one or more of the links below. The money made helps me feed my growing family and keeps this blog running with free recipes. Thank you!

Roasted Shrimp & Feta Quinoa (THM E)

  • Servings: 6
  • Difficulty: Easy
  • Print


Credit: Erin Murray, My Fling with Food

Ingredients

  • 1.5 – 2lbs shrimp, peeled and deveined
  • about 2 cups cooked quinoa
  • juice of 2 lemons
  • 1 English cucumber, seeded and diced
  • 1/4 c finely diced red onion
  • 4-5 sprigs fresh dill, roughly chopped
  • 1/2 small bunch of parsley, chopped
  • 4 scallions, whites and green parts, sliced
  • 2 Tbsp crumbled feta cheese
  • salt and pepper

Directions

  1. Preheat oven to 400.
  2. Spread shrimp onto a large baking sheet, spritz with coconut oil spray, and season with salt and pepper. Toss to combine, then roast at 400 for about 6 minutes.
  3. In a large bowl, combine the cooked quinoa with all other ingredients. Give it a big toss, taste for seasoning, and serve.

Easy Grilled Asparagus (THM FP)

This post contains affiliate links, which means I receive a commission off of purchases made using these links. If you’re interested in fitness, the Trim Healthy Mama lifestyle, or just living a more healthy life, please consider using one or more of the links below. The money made helps me feed my growing family and keeps this blog running with free recipes. Thank you!

I love no-fuss sides that add a fresh complement to any meal – this easy grilled asparagus is definitely one of them.

PicsArt_03-27-02.47.14.jpg

Asparagus on the grill can be a little frustrating. You don’t want the thicker bottoms to be too raw, and if you cook them longer the tops may burn – UGH. Well, this method will give you perfectly tender, slightly smoky asparagus every time. The best part? You only need 3 ingredients!

Let’s start with the star of this side – the asparagus. When you buy fresh asparagus at the store, make sure you use it within about 2-3 days of purchase. The easiest way to cut off the fibrous stumps is to leave the bottom rubber band on, and cut the whole bunch at once right above that band (about 1-1 1/2 in. from the bottom).

20170320063334_IMG_2879

Next, you’re going to quickly blanch the asparagus. Don’t be scared – all blanching means is that you’re going to cook it for a short amount of time, and then shock it really fast to stop the cooking. This ensures that your asparagus will be perfectly al dente all the way through.

You’ll get a pot going with a few inches of water and a big pinch of salt. Doesn’t have to be a lot of water, just enough to submerge the asparagus. Also, make sure that your pot is wide enough to fit the asparagus laying horizontally. While the water comes to a boil, get your shock bowl ready with ice water.

When it boils, drop the asparagus and cook it for 3 minutes (time it!). If you have some asparagus that’s on the thicker side, cook it for 4 minutes.

20170320064002_IMG_2887

At the end of 3 minutes, use a wire spider to remove the asparagus from the boiling water, and place it immediately into the prepared ice bath. Let it hang out there for about a minute.

20170320064143_IMG_2889

This method keeps your asparagus vibrant green, while also getting it cooked.

Next, heat up a cast iron grill with a spritz of coconut oil spray. Remove the asparagus to a paper towel to dry off the excess water, then place it onto the hot grill.

It doesn’t need much cooking, just until it has some grill marks on each side (you don’t want it looking like a limp noodle though).

Take it off the grill, place it onto a plate, and lightly season with salt and pepper.

Lightly zest a lemon. I like using this easy grip zester because it gives the long, pretty curls of zest. If all you have is a regular microplane or zester, that’s fine too.

20170320063602_IMG_2880

Throw some of that zest right over the warm asparagus, and finish with a light sprinkle of Parmesan or Pecorino Romano cheese. Of course, if you’re paleo or dairy free, just leave the cheese off.

PicsArt_03-27-02.51.23

This is a light, zesty, fresh (and fast!) vegetable side that can literally go with anything. My husband’s favorite side is asparagus, and he raved about how perfectly cooked this was. He even ate the asparagus bottoms, whereas he’s normally a strict upper-half-only guy.

Easy Grilled Asparagus (THM FP)

  • Servings: 4
  • Difficulty: Easy
  • Print


Credit: Erin Murray, My Fling with Food

Ingredients

  • 1 bunch fresh asparagus
  • zest of 1 lemon
  • light sprinkle of Parmesan or Pecorino Romano cheese, optional
  • salt and pepper
  • coconut oil spray

Directions

  1. Bring a pot with salted water up to a boil. Also prepare a large bowl with ice water off to the side.
  2. Boil the asparagus for exactly 3 minutes, remove with a wire spider, and place directly into a prepared ice bath. Leave the asparagus in the ice bath for about 1 minute. Remove and pat dry.
  3. Heat a grill pan with a spritz of coconut oil. Place the asparagus onto the hot grill and grill it for about 2 minutes.
  4. Place the grilled asparagus onto a plate. Season lightly with salt and pepper, lemon zest, and a sprinkle of cheese.

10 Reasons Why You Need Cast Iron in Your Life

This post contains affiliate links, which means I receive a commission off of purchases made using these links. If you’re interested in fitness, the Trim Healthy Mama lifestyle, or just living a more healthy life, please consider using one or more of the links below. The money made helps me feed my growing family and keeps this blog running with free recipes. Thank you!

What’s all the fuss about cast iron? Are they really that useful? Are they high maintenance? What exactly do you *do* with cast iron?

I’ll answer all these questions with tips on how to make it last 100 years.

picsart_10-03-09-01-54

First off, cast iron is not a new thing. Grandmas in the South will tell you all about their cast iron that they received as wedding gifts 50 (or more) years ago. That’s the beauty of cast iron – when you take care of it (which is not hard, AT ALL) it will last forever.

These are my 10 Reasons Why You Need Cast Iron in Your Life:

  1. Cast Iron is non-stick. Season your cast iron with coconut oil, bacon fat, or store-bought lard and nothing will stick to those babies. Which also means you can use less oil when cooking.
  2. It’s easy to maintain. Most of the time, I can clean my cast iron by simply wiping it with a damp paper towel. Really, it’s that easy. However, for the occasions when there are some stuck-on bits from cooking, place some warm water over the affected area and wait a few minutes. Most of the time, water is enough to lift the tough bits, but if it isn’t just use a gentle plastic scrubber. Do not use soap with cast iron. I’ll say it again – DO NOT CLEAN CAST IRON WITH SOAP. Soap removes the seasoning, which removes the non-stick property. And, for the love, never EVER put it in the dishwasher. Just don’t.
  3. It holds temperature. Cast iron retains and distributes heat very evenly. That’s why it’s great for baking, frying, and searing.
  4. Iron is good for you. While cast iron doesn’t leach chemicals, like some other coated nonstick cookware, it does fortify your food with iron. Iron deficiency is fairly common worldwide, especially among women. Cooking food in cast iron will fortify your food with a small percentage of iron. Cooking something acidic, like tomato sauce, in cast iron will raise iron levels by nearly 20 times.
  5. You can grill year-round. I adore my combo cast iron grill/griddle. You can have the smoky, char-grilled  flavors of summer all year without having to step foot outside. Just like the skillets, the grill retains heat and you get the beautiful grill marks and flavor with less of the hassle.
  6. No more pancake accidents. I had non-stick electric griddles for YEARS. Then, one day I couldn’t get through a batch of pancakes because every. single. one. would stick to my griddle. I used oil, I tried different temperatures, and still would have at least half my batter in crumbles and pancake remnants. Then, I got my cast iron grill/griddle, and everything changed. No more burnt or sticking pancakes! I wish I had saved myself the headache years ago.
  7. Pass it on to your kids and grandkids. No joke, my cast iron pans will probably outlive me. Those suckers can take a beating! You can drop, bang, and even scorch them all you want and they’ll still come out looking perfect. It’s really hard to actually hurt or mess these things up.
  8. Cheap in price, but not in practice. You know those kitchen gizmos you get for cheap (as in very little money) knowing they won’t last? This isn’t one of those. Cast iron cookware is very affordable, and it will last forever (See also #7). If you’re the garage-saling type (which I am ^_~), I’m willing to bet you could find some cast iron pans for a couple bucks. People will toss perfectly good pans simply because they don’t know how to properly season them. Madness! (If you’re ever in need of re-seasoning your pans, check out this guide on how to do it.)
  9. It’s versatile. You can cook anything from bacon and eggs, to cornbread, steak, chili, stews, and skillet desserts. You can also use cast iron on any cooktop: ceramic, gas, electric, you name it. Also, how many pans do you know of that can go from the stovetop, to the oven, straight to the table? I mean, really I’m saving you from doing too many dishes, if nothing else.
  10. Iron builds muscle. OK, these cast iron tools are HEAVY. At the very least, you’ll build your biceps working with cast iron.

Now that we’ve established why you should have cast iron, you may be wondering, “What can I make with it?” I’m glad you asked. ^_^

Here are a few of my favorite cast iron grill/griddle recipes:

20161001211458_img_1691

And here are some for cast iron skillets/Dutch ovens:

Burgers:

picsart_01-11-10-32-56

Baked Goods:

20160914065415_img_1278

Meats and Sides:

20161025075732_img_1941

Soups/Stews/Chili:

picsart_12-13-12-35-21

Here are some bonus recipes from a few of my blogger friends:

Sweets:

Chocolate-Chip-Skillet-Cake-Main.png

Lunch/Dinner:

Chipotle-Chicken-with-Sweet-Potatoes-blog.jpg

Chicken-Enchilada-Skillet-Main.png

Do you have cast iron in your kitchen? What are some of your favorite  recipes using cast iron?

Grilled Chicken Tabbouleh Salads (THM E)

This post contains affiliate links, which means I receive a commission off of purchases made using these links. If you’re interested in fitness, the Trim Healthy Mama lifestyle, or just living a more healthy life, please consider using one or more of the links below. The money made helps me feed my growing family and keeps this blog running with free recipes. Thank you!

Prep work will go a long way in this meal, but even without the prep you can still get in and out in under 30 minutes.

PicsArt_03-15-10.48.13

What is tabbouleh, you ask? Tabbouleh is a Middle Eastern salad typically made with bulgur wheat, veggies, lemon, and herbs.

To get this into THM territory, I used quinoa in place of the bulgur wheat.

I gotta say, even for an E meal, this meal was packing the flavor and protein. This isn’t one of those E meals that leaves something to be desired after. It will fill you up for hours! In fact, it would make a wonderful take-to-work lunch.

What’s going to take you the most time will be the quinoa tabbouleh, so get that going first. Quinoa is best when you rinse it prior to cooking, and I like to “toast” it slightly in my sauce pan before adding the chicken broth or water. The toasting helps to separate the grains and keep them slightly al dente. Plus, it adds a little extra flavor, which is never a bad thing.

While the quinoa cooks, go ahead and prep the tzatziki dressing. Combine yogurt, mint, water, lemon zest, lemon juice, garlic, red pepper flakes, salt and pepper. Cover and refrigerate until your ready to serve.

When the quinoa is cooked, add it to a bowl with the cucumber, tomatoes, scallions, parsley, EVOO, mint, lemon juice, salt and pepper. Remove it to the fridge until you’re ready to put the salad together.

Next, grill the chicken breasts. My shortcut tip here is to use scallopini cut chicken breasts. They cost the same as normal cut ones, but they’re cut thinner so they cook faster. I season them simply with salt and pepper and throw them onto my cast iron grill.

Now you’re ready to build the salads!

Pick your favorite green salad mix – I always gravitate towards baby spring mix, because it’s less bitter than other blends. Throw in some extra Romaine and/or red/green leaf lettuce for some padding (and, really, we all need those greens). The tabbouleh already has tomatoes and cucumbers in it, but you can add extra if you desire. Pile the tabbouleh on top of your greens, then add the sliced chicken, and dollop on the creamy tzatziki dressing.

PicsArt_03-15-10.50.28

This is definitely going to turn into a weeknight go-to for us. The effort was minimal, but this dish packs some big flavors. Plus, it’s a light summer meal that doesn’t heat the kitchen or require blood, sweat, and tears.

Perfect combo, ammiright?

Grilled Chicken Tabbouleh Salads (THM E)

  • Servings: 2-4
  • Difficulty: Easy
  • Print


Credit: Erin Murray, My Fling with Food

Ingredients

    For the Tabbouleh:
  • 1 c cooked quinoa
  • 1/2 English cucumber, lightly skinned and finely chopped
  • 2 Roma tomatoes, seeded and finely chopped
  • 3 Tbsp lemon juice
  • 1/4-1/2 c mint
  • 1 Tbsp EVOO (Extra Virgin Olive Oil)
  • 4 scallions, thinly sliced
  • 1/2 c chopped fresh parsley
  • salt and pepper
  • For the Tzatziki Dressing:
  • 1/2 c nonfat Greek yogurt
  • 1/4 c mint
  • 3 Tbsp water
  • lemon zest
  • 1 Tbsp lemon juice
  • 1 small garlic clove, grated
  • pinch red pepper flakes
  • salt and pepper
  • For the salad:
  • Mixed salad greens
  • Romaine lettuce leaves/Red or Green leaf lettuce
  • tomatoes, cucumbers, onions, etc. (optional)
  • Sliced, grilled scallopini chicken breasts

Directions

  1. To make the tabbouleh, combine quinoa, cucumber, tomatoes, scallions, parsley, EVOO, mint, lemon juice, salt and pepper. Cover and refrigerate until serving.
  2. To make the dressing, combine the yogurt, mint, water, lemon zest and juice, garlic, red pepper flakes, salt, and pepper. Stir to combine, cover, and refrigerate.
  3. Preheat your grill to medium heat and coat it lightly with coconut oil spray. Season chicken with salt and pepper and grill 3-4 minutes on each side until cooked through. Set aside and cover with foil to continue cooking.
  4. Build salads with romaine and mixed greens on the bottom, 1/2-3/4 c tabbouleh, sliced grilled chicken, and a drizzle of the mint yogurt dressing.
  5. For lunches, keep the salad greens, tabbouleh, and dressing separate until serving for optimal results.


Save

Kabobs & Cauli

Summertime is for grilling! And what better way to get in the spirit of grilling than a good kabob?

20160719063807_IMG_1008

Grilling, to me, means you get more flavor in less time. This is definitely part of my Dad’s personality in me, but I LOVE a good char. It makes food more appealing to the eye, and adds depth of flavor. I don’t have an outdoor grill, but my cast iron grill certainly gets the job done.

Where I struggle is sides!

So, as I was flipping through my Barefoot Contessa cookbook I came across an herbed rice recipe. The concept may be simple, but let me tell you the flavor is awesome.

I decided to swap her jasmine rice for cauliflower rice (gluten free and low carb, score!) and I added sliced almonds for a little crunch. I’ll tell you, the almonds aren’t completely necessary but they do add a nice textural component.

Since it’s not necessary for my creatures and husband to be low carb, I added some steamed brown rice to theirs for balance. Just because momma doesn’t eat the carbs doesn’t mean everyone has to do without – they are growing creatures, after all.

20160719063824_IMG_1010

Beef Kabobs with Herbed Cauliflower Rice (THM S)

  • 1-1.5lbs beef sirloin steak, cubed
  • 2 Tsp soy sauce, or liquid aminos
  • Juice of 1 lime
  • 2 tsp Worcestershire sauce
  • Veggies of choice: cherry tomatoes, red onion, bell pepper, eggplant, zucchini, mushrooms, etc.)
  • 1 small head cauliflower
  • 2 Tsp butter
  • 2 Tsp fresh chopped parsley
  • 1 Tsp fresh chopped dill
  • 1 scallion, thinly sliced
  • Small handful of sliced toasted almonds (Optional)
  • Salt and pepper
  • EVOO

Start by marinating the steak. Into a large gallon bag, add the soy sauce, lime juice,  Worcestershire, and pepper. Squish with your hands to combine, then add the steak cubes, zip the bag shut, and massage the marinade into the steak. Set aside in the fridge until 10 minutes before cooking.

*If you’re cooking these kabobs over an outdoor grill, be sure to soak your wooden skewers in water for the afternoon. It helps them not to burn on the grill.

Once you’re ready to assemble the kabobs, take the steak out of the fridge and begin cubing your veggies. I like big pieces, so I kept everything around an inch. If you’re using eggplant, skin the eggplant before cubing it.

Before skewering the veggies, place them into a small bowl and drizzle with EVOO, salt and pepper. Toss with your hands to combine.

I like to put the meat on skewers with slices of onion and bell pepper, and put the other vegetables on skewers together. You want to put things that have the same cooking time on skewers together, that way it all cooks evenly.

For the rice, cut the cauliflower into large pieces, and pulse it in a food processor until desired consistency. Place the crumbles into a microwave safe bowl, cover with a damp paper towel, and cook for 7-8 minutes. (For a higher-powered microwave, this time will be less, so go for a few minutes at a time.) Take it out, add the butter, salt and pepper, toss to combine. When rice has cooled slightly, add the herbs and almonds.

Preheat your grill to medium heat, spray it lightly with coconut oil, and lay the kabobs in one even layer. Then…LEAVE THEM ALONE. You want beautiful grill marks, and slight softening on the veggies. Step away from the grill! Cook the rice while you do this. Turn after a good 4-5 minutes (on the steak, more like 3 minutes for medium pinkness).

When all the kabobs are cooked, scoop a big helping of cauli rice onto your plate and follow with a few kabobs.

20160719064050_IMG_1011

Dive right in!

Less Time, More Flavor

Y’all already know that my girl, Rachael Ray, and I are besties.

I have more than a few of her cookbooks, and over this last week I found myself looking for inspiration the old-fashioned way – in a book. I’ve flagged a ton of recipes, and only tried a few (much like Pinterest, no?). So, as a challenge to myself, I’m trying new recipes every week.

20160718071539_IMG_1002

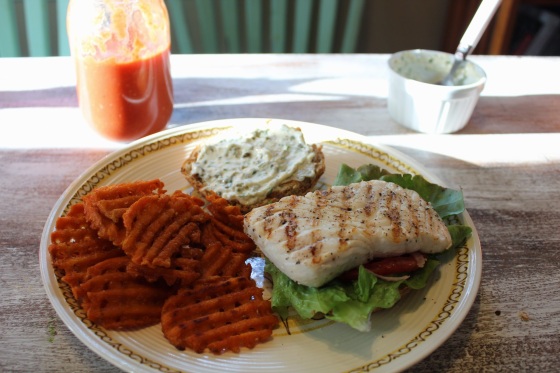
Enter fishwiches.

We’ve all had a fish sandwich, right? Usually something fried, and a bit on the heavy side.

This one is a game changer.

Everything about it is bright, fresh, and hearty. The homemade sauces are what make it. I even upgraded the ketchup! Traditional ketchup off the shelf is packed with  sugar, so I’ve stopped buying it (much to my children’s dismay). I built that one from the ground up, and the store gave me some help with the mayo.

[Recipe adapted From Rachael Ray’s Just in Time Cookbook, Grilled Fish Sammies.]

20160718071559_IMG_1004

Grilled Fishwiches with Garlic Aioli and Bloody Ketchup (THM E)

  • 1 lb halibut filets, skin removed
  • Sprouted sandwich  buns
  • Sandwich toppings: lettuce, tomato, pickles, onions, etc.
  • 1/4 c light mayo
  • 1 Tsp capers, lightly chopped
  • 1 Tsp fresh  chopped parsley
  • 1 clove garlic, grated
  • juice of 1/2 lemon
  • 1 bag frozen sweet potato fries (I used waffle style)
  • 1/4 c tomato paste
  • 1/4 c water
  • 2 Tsp apple cider vinegar
  • 1-2 packets Truvia, or Gentle Sweet
  • 2 tsp Worcestershire sauce
  • 2 tsp (up to 1 Tsp) prepared horseradish
  • hot sauce, to taste
  • salt and pepper

For the garlic aioli, combine light mayo, capers, lemon, garlic, parsley, salt and pepper in a small bowl. Whisk to combine, and set in the fridge.

For the ketchup, whisk the water and tomato paste until well combined. Adjust the water as needed, adding a little at a time. Too thick, add more water. Add the apple cider vinegar, salt, and sweetener. Adjust until you achieve the regular “ketchup” flavor you like. Then add the Worcestershire, horseradish, hot sauce, and taste for salt and pepper. Set that in the fridge until go time.

Begin by cooking the fries according to package directions. For my THMers, I place them on a parchment lined baking sheet, to avoid having to spray. You can gloss them with a small spritz of coconut oil if you like. Also, one of my best tips (especially for summer cooking) is to throw those puppies in the oven before it’s preheated. Your cooking time will be less, and you won’t have to crank the temperature way up to get them done sooner.

For the fish, preheat a cast iron (or outdoor) grill to medium heat, and spray lightly with coconut oil. Season the fish simply with salt and pepper. Place the filets on the hot grill, and grill until they cook through (about 3-4 minutes on each side for my 3/4 in. filets).

After the filets are done cooking, slice the sandwich rolls and place them cut-side down on the warm grill to lightly toast.

Build your sandwich with the toppings of your choice (I’m a lettuce, tomato, onion gal) and a smear of garlic aioli. Serve it up with your crunchy fries and bloody ketchup.

If you’ve never tried halibut, DO NOT BE AFRAID. This was my first time cooking and eating halibut and I can honestly say I loved it. My creatures loved it too! Plus, it was super easy to work with. And on a busy weeknight, what more can you ask for?

And P.S., the leftovers are just as good the next day!

Sicilian Swordfish

Swordfish has always been one of those proteins that seemed a little intimidating. You don’t see it very often, and it can be expensive (insert moments of holy-crap-I-don’t-want-to-shell-money-for-this-and-screw-it-up here).

When I saw it fresh, on sale at Sprouts I decided to tackle it. I got one [huge] swordfish steak from the fresh meat counter, and began researching ways to cook it. Of all the ways there were to go with it, I decided to go Sicilian. The oil, lemon, and herbs were bright yet light for summer.

If you haven’t tried swordfish before, this is definitely the way to go. I found it to be very mild in flavor and easy to infuse your own spin.

20160622065536_IMG_0597

Sicilian Swordfish (THM S)

Serves 2-3

  • 1 lb swordfish steaks
  • 2 cloves garlic, finely grated
  • juice of 1 lemon
  • 2 Tsp EVOO
  • 1/4 c white wine
  • fresh chopped parsley
  • salt and pepper

If you end up with a large 1-lb swordfish steak, butterfly it (or you can ask the butcher to do this, which in retrospect I would have done). To butterfly, use a longer sharp knife, begin cutting in the middle of the largest side and make long cuts while opening the steak like a book.

Combine  the garlic, lemon, wine, and EVOO in a small bowl and set aside.

Season the swordfish with salt and pepper and place it onto a hot grill pan. Cook about 4-5 minutes on each side, depending on thickness, until cooked through.

Have a small sauce pan heated to medium on the side, and when the swordfish is cooked through add it to the sauce pan with the reserved lemon-wine sauce. Let the wine cook out for about 3 minutes. Turn the heat off and add the parsley on top.

20160622065658_IMG_0603

Finito! How quick and easy was that?

Mile-High Bunless Burgers

I love burgers any which way – turkey, beef, veggie, you name it. With the warm weather finally settling in, I am craving burgers all the time. Which isn’t a bad thing, because burgers done right can be a healthy and filling meal.

Most  of the time, burgers are done with potatoes – fries, potato salad, mashed potatoes, tots, sweet potato fries, baked potatoes…I could go on, but at the risk of sounding like Bubba, I’ll stop. To keep it low carb, I have been pairing my burgers with a big pile of buttered broccoli. However, I experimented a little and came up with, what I believe, to be a pretty darn good low carb mac and cheese. It was so rich, creamy, and delicious – and doesn’t put me into Crossover territory meal-wise. (That may sound like a foreign language, “Crossover,” but my fellow Trim Healthy Mamas will get me. Trim Healthy Mama is the food plan I follow that helps me lose and maintain weight. I will never refer to THM as a diet, because it’s not. It’s food freedom! If you’d like to learn more about the THM plan, you can do so here.)

Onto the good eats!

Jalapeno Bacon Cheese Burgers with Low Carb Mac and Cheese

Jalapeno Cheeseburgers (THM S)

  • 1lb grass-fed beef (mine was 85% lean, don’t be afraid of fat!)
  • 1 tsp cumin
  • 1 tsp coriander
  • 1 tsp garlic powder
  • 1/2 tsp smoked paprika
  • 1/4 tsp chipotle chile powder
  • Salt and pepper to taste
  • Diced pickled jalapeños to taste (I used about 1 Tsp)
  • Sprinkle of shredded sharp cheddar
  • Toppings: lettuce for the “bun”, tomato, pickles, cooked bacon, red onion, mustard, sugar free ketchup, mayonaise

Mix well, form into a mound, and score into 4s to get even patties. Make a dimple in the middle to prevent puffing. Grill to desired temperature, and top with thin-sliced hard cheddar.

Mac and Cheese (THM S)

  • 1/2 lb of Dreamfield’s rotini noodles (Essential! Learn more about Dreamfield’s)
  • 2 cups shredded sharp cheddar cheese
  • 1 1/2 c unsweetened almond milk
  • 1 tsp zanthan gum
  • 1 tsp dijon mustard
  • 3 heaped Tsp nutrional yeast (not essential, but helpful in kicking the sweetness of the milk. Plus, it’s good for you.)
  • 1 Tsp butter
  • Salt and pepper

Heat milk, butter, and mustard in a small pan. Once heated, add zanthan gum while whisking. Once sauce begins to thicken, sprinkle in cheese in 2 or 3 batches. Whisk in nutritional yeast, and turn off the heat. Add sauce to cooked pasta and enjoy! (NOTE* You can have up to 1 cup of Dreamfield’s pasta without going it being a Crossover.)