Red, Wine, & Bleu Burgers (THM S)

Burgers are a staple in my household. Husband loves them. Kids love them. I love them! Plus, they are ridiculously easy to make.

PicsArt_06-02-05.49.11.png

This whole recipe (burgers plus a sauce topper) is less than 10 ingredients. Unbelievable, I know, but this recipe packs in the flavor with just a few ingredients.

I seasoned up 2lbs of ground beef sirloin with sliced scallions, salt-free all purpose seasoning, Worcestershire sauce, and dry sherry.

It probably sounds weird to “season” burgers with wine before cooking, but trust me the flavor is *amazing*. The sherry adds a beautiful depth of flavor while keeping the burgers nice and moist. I cooked my burgers to a strong medium (warm, pink center) and there was no trace of raw alcohol.

Mix the burgers with your hands until just combined, score with the side of your hand into sections (for even patties – I got about 7 big burgers out of this), and form into patties.

PicsArt_06-26-04.06.54

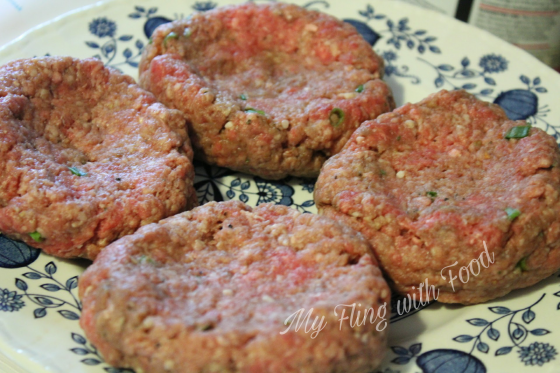
My best burger tip is to always make these slight dents in the center of your patties prior to cooking. The centers rise as they cook, so instead of them rising and you ending up with cylindrical burgers they rise to the height of the outsides, making it flat.

Before tossing your burgers onto the grill or sauté pan, season each one with a little extra salt and pepper on the outsides. This helps to ensure they’re seasoned well.

I cooked these burgers in a cast iron skillet for about 4-5 minutes on each side, turning only once.

While the burgers are cooking, make the bleu cheese sauce.

Place the sour cream into a small bowl with the bleu cheese crumbles, a few dashes of hot sauce, salt and pepper, and a touch of half and half or heavy cream to slightly thin the sour cream.

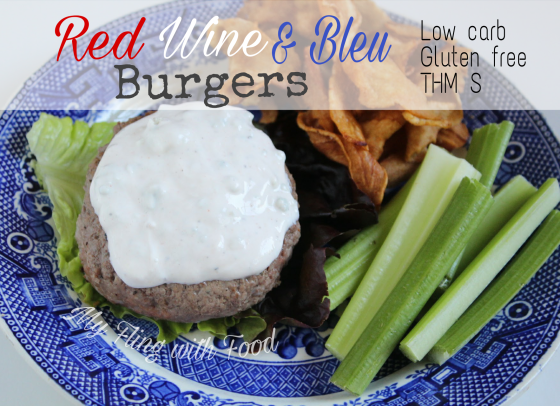
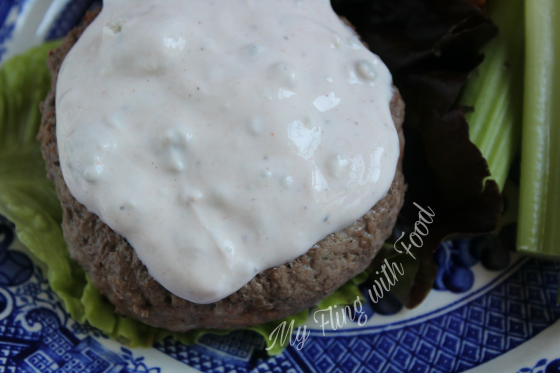
When the burgers are done, top each one with a generous helping of bleu cheese sauce. I served my burger alongside some fresh celery sticks and Trader Joe’s parsnip chips (which are seriously amazing, by the way. 1g of net carbs per serving and they’re a real chip!).

IMG_20170531_193244_464.jpg

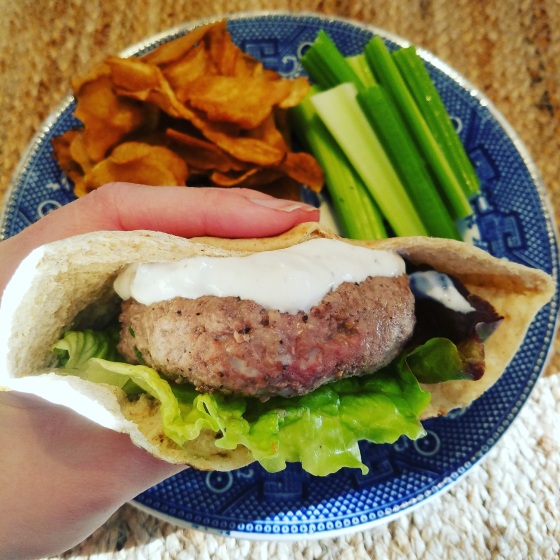
You can serve the burgers atop lettuce (red or green leaf would be a great choice), or stuff it into half a Joseph’s pita. Either way, it’s delicious!

PicsArt_06-26-04.10.16

The burger itself really is incredible – the sherry keeps it moist while adding a slight red wine flavor and the dry seasoning adds a punch of different herbal notes (citrus, parsley, rosemary, etc.) with a little hint of onion from the scallions.

The bleu cheese sauce makes it rich and a little tangy from the cheese. [Really, I think beef and bleu cheese were put on this Earth to be best buds because they certainly rock together.]

These burgers would be perfect for a holiday party! With a burger this good, your guests will be knocking down your door for the recipe.


This post contains affiliate links, which means I receive a commission off of purchases made using these links. If you’re interested in fitness, the Trim Healthy Mama lifestyle, or just living a more healthy life, please consider using one or more of the links below. The money made helps me feed my growing family and keeps this blog running with free recipes. Thank you!

Red, Wine, & Bleu Burgers (THM S)

  • Servings: 4-6
  • Difficulty: Easy
  • Print


Credit: Erin Murray, My Fling with Food

Ingredients

    For the burgers:
  • 2lbs ground sirloin
  • 3 scallions, thinly sliced
  • 1 1/2 Tbsp salt-free all purpose seasoning
  • 2 tsp Worcestershire sauce
  • 1/2 c dry sherry, or other dry red wine
  • salt and pepper
  • For the bleu cheese sauce:
  • 1/4 c sour cream
  • 1/4 c bleu chesse crumbles
  • 4-6 dashes hot sauce
  • salt and pepper
  • half and half or heavy cream to thin slightly (about 1-2 Tbsp)

Directions

  1. Preheat a large skillet or grill over medium-high heat.
  2. Combine all ingredients for the burgers in a large bowl, and use your hands to incorporate everything together gently. Score the meat with the side of your hand into even secitons, then form patties. Make a slight dent in the center of your burgers for even cooking, then season the outsides with salt and pepper before cooking.
  3. Cook for about 4-5 minutes on each side, turning only once.
  4. While the burgers cook, prepare the bleu cheese sauce.
  5. Combine all ingredients for the bleu cheese sauce in a small bowl and set in the fridge until serving time.
  6. When the burgers are finished, top each one with a couple generous tablespoons of bleu cheese sauce. Enjoy as a lettuce burger, or stuff it into a Joseph's pita.

Crockpot Mexican Shredded Beef (THM S)

If you can believe it, this was my first time EVER making a beef roast. Trust me when I say this shredded beef is easy, flavorful, and versatile!

PicsArt_04-30-02.57.37

I love using my Crock Pot for various reasons, but overall it makes dinner insanely easy and it cooks without heating up the kitchen. Between preschool drop off, working, and getting my daughter to and from karate (right before dinner, no less) dropping something in the crock pot is definitely the easiest part of my day. The best part is coming home to a fully cooked dinner!

Let’s get to the nitty gritty of the recipe – start with a 2.5 – 3lb boneless beef roast.

20170424220951_IMG_3205

Next, throw the dry spices together in a small bowl: chili powder, cumin, ground coriander, smoked paprika, cayenne, oregano, salt and pepper. Stir them up, activating the spices by rubbing them gently between your fingers.

Season the whole roast on both sides, massaging the spices into the meat.

Into the bottom of your crock pot, stir together the broth (any variety is fine), lime juice, tomato paste, onion, garlic, jalapeño, and Fresno chili. Fresno chilis look like red jalapeños and are similarly flavored. You could also use another jalapeño, Serrano pepper, Anaheim pepper, or a different pepper of similar heat level.

For the peppers, you can remove the ribs and seeds or leave them. I seeded half of my peppers, and the beef remained moderately spicy. I sliced everything straight across, because the crock will cook everything down to falling apart texture and tiny cuts aren’t needed.

Lay the seasoned beef roast on top of the veggies, place the lid, and set it on low.

20170424221431_IMG_3213

Let it go low and slow for 8-10 hours until it’s falling apart.

PicsArt_04-30-02.59.51

After it’s done cooking, shred the roast between two forks. I say shred, but really that roast cooks up so tender that you could touch it with a fork and it just falls apart. Serve it right up, any way you like it. I put it over a big bowl of greens with some salsa, avocado, and fresh cilantro with a low carb tortilla on the side. My family enjoyed the beef as tacos with sliced avocados.

20170425073019_IMG_3224

The beef is incredibly soft and tender. You get a hint of lime juice and a little smoky, spicy kick from the spices and peppers. All in all, it’s the perfect, casual way to enjoy a roast.

The leftovers could be used for salads or burritos later in the week. You could even throw them into a breakfast hash, because WHY NOT.

This post contains affiliate links, which means I receive a commission off of purchases made using these links. If you’re interested in fitness, the Trim Healthy Mama lifestyle, or just living a more healthy life, please consider using one or more of the links below. The money made helps me feed my growing family and keeps this blog running with free recipes. Thank you!

Crock Pot Mexican Shredded Beef (THM S)

  • Servings: 4-6
  • Difficulty: Easy
  • Print


Credit: Erin Murray, My Fling with Food

Ingredients

  • 2-3lb boneless beef roast
  • 1 medium red onion, sliced
  • 1 jalapeño pepper, (seeded or not) sliced
  • 1 Fresno pepper, (seeded or not) sliced
  • 2 garlic cloves, minced
  • 1/4 c broth (any variety, I used chicken)
  • juice of 2 limes
  • 3 Tbsp tomato paste
  • 1 1/2 Tbsp chili powder
  • 2 tsp ground cumin
  • 1 tsp ground coriander
  • 2 tsp smoked paprika
  • 1/8 tsp ground cayenne
  • 1/2 tsp dried oregano
  • salt and pepper
  • Toppings of choice: avocado, salsa, sour cream, fresh cilantro, cheese, etc.

Directions

  1. Combine the dry spice mixture in a small bowl, grinding it lightly between your fingers to activate the spices.
  2. Season the beef with the entire spice mixture, massaging it all over the meat.
  3. In the bottom of your crock pot, combine the tomato paste, broth, lime juice, onions, peppers, and garlic.
  4. Lay the beef roast on top of the veggie mixture, cover, and set on low for 8-10 hours.
  5. After 8-10 hours, shred the meat between two forks and serve immediately.

Sunday Bolognese (THM S)

This post contains affiliate links, which means I receive a commission off of purchases made using these links. If you’re interested in fitness, the Trim Healthy Mama lifestyle, or just living a more healthy life, please consider using one or more of the links below. The money made helps me feed my growing family and keeps this blog running with free recipes. Thank you!

Bolognese is basically an Italian meat sauce. It has a different flavor than traditional marinara, and usually has some vegetables in it as well. I call this my “Sunday Sauce” because you can make it on Sunday, and it tastes just as good (or better!) on Friday.

picsart_02-26-11-56-09

This sauce comes together in one, big pot on your stove top, and it’s low-maintenance (lots of simmering, not a ton of stirring).

When I make Bolonese, I always make extra for freezing. It’s perfect with Dreamfields Noodles, spiralized squash/zucchini, eggplant steaks, Lazy Lasagne (Trim Healthy Mama Cookbook page 140), or any other Italian fare you can dream up. My kids love this sauce, and will eat anything I put with it.

Start with 1 1/2 – 2lbs ground beef. I used 85% lean, but you can go for whichever variety your family likes best. Sauté it with salt, pepper, garlic powder, and some dried basil. When the meat begins to brown, start breaking it up with the back of a wooden spoon or spatula. When the meat is mostly cooked, add the shallots, garlic, celery, grated carrot, and onions. I use a fine hand grater to get small strings of grated carrot. The best thing about using a hand grater, as opposed to a box grater, is that you can hover it over the pot and grate straight down into it. No extra step of transferring it from the cutting board to the pot. Plus, when it’s cut that small there’s no need for peeling.

When the vegetables begin to soften, de-glaze the pan with one heaping cup of red wine. Don’t fall for the “cooking wine” tricks here – you want to use something dry, bold in flavor, and that you would enjoy drinking. If you don’t enjoy the taste of it uncooked, then you really won’t like it once it’s reduced and concentrated. I used a Côtes du Rhône because I still had some left over from my Coq Au Vin, and it was just enough for this recipe. The Côtes du Rhône gave my sauce a bold, deep flavor, and I highly suggest it if you can find it in your grocery store. (I found mine at Costco for around $10).

Finally, add the whole can of crushed tomatoes with their juice and a touch more salt and pepper. Place the lid on your pan, and let it simmer on medium heat for about 10-12 minutes. Then remove the lid and continue simmering until sauce is reduced and thickened.

Turn off the heat, taste and adjust for seasoning, then add one large handful of fresh chopped parsley.

picsart_02-26-11-58-38

What you end up with is a bold, hearty, sauce that’s slightly fruity from the red wine. It’s perfect to use right away, or you can cool and package it up for Italian night later in the week (all it will need is some heat). Like I said earlier, this sauce only gets better with time, so there are no disappointing leftovers here.

Sunday Bolognese (THM S)

  • Servings: 6-8
  • Difficulty: Easy
  • Print


Credit: Erin Murray, My Fling with Food

Ingredients

  • 1 1/2 – 2lbs ground beef (I used grassfed 85% lean)
  • 1 heaping cup dry red wine
  • 1/2 small onion, diced
  • 1 large stalk celery, finely diced (leafy greens included)
  • 1/2 medium carrot, finely grated
  • 2 cloves garlic, minced
  • 1 small shallot, minced
  • 1 28-oz can crushed tomatoes with basil
  • 1 large handful chopped fresh flat leaf parsley
  • 1/2 tsp garlic powder
  • 1 tsp dried basil
  • salt and pepper

Directions

  1. Start by browning the ground beef in a large skillet over medium heat, breaking it up with the back of a wooden spoon or spatula. Season with garlic powder, dried basil, salt, and pepper.
  2. Add the onions, shallots, garlic, celery, grated carrot, and a touch more salt and pepper. Continue sautéing until onions begin to get soft, about 5-6 minutes.
  3. De-glaze the pan with the red wine, then add the crushed tomatoes and a little more salt and pepper. Cover and let simmer over medium heat for about 10-12 minutes. Remove the lid and continue simmering another 10 minutes, until sauce is thickened and slightly reduced.
  4. Turn off the heat, add the parsley, taste and adjust for seasoning. Serve immediately, or cool and store until future use.

Clean Eating Shepherds Pie (THM E)

This post contains affiliate links, which means I receive a commission off of purchases made using these links. If you’re interested in fitness, the Trim Healthy Mama lifestyle, or just living a more healthy life, please consider using one or more of the links below. The money made helps me feed my growing family and keeps this blog running with free recipes. Thank you!

Only in my recent years I’ve come to have a love for shepherds pie. It wasn’t a dish I grew up with, but it’s grown into being a Winter staple in my household. It’s easy to prepare, uses simple ingredients, and can feed an army.

picsart_01-04-11-53-37

I started this pie using low fat, grass-fed ground beef. It’s not traditional for a shepherds pie, however it lends a lot of great flavor. I then sautéed it with a little red onion, celery, cremini mushrooms, carrots, shallots, and garlic. I sprinkled the mixture with a little xanthan gum, then de-glazed the pan with about a cup of dry red wine and reduced the mixture for about 7 minutes.

When the wine is reduced by about half, turn the heat off, add the peas, parsley, and thyme then set aside.

Meanwhile, I had my creamy potato topping going in a separate pan.

I peeled and diced 5 medium white sweet potatoes. Yes, these things exist! I found them bagged at Trader Joe’s – they have purple skin and white flesh. I also peeled and diced two large parnsips to go with it. Parsnips have a slightly spicy flavor, which helps cut the sweetness of the sweet potato and they make for a very velvety puree.

I boiled those down together for about 12 minutes, in salted water, so that everything was nice and tender.

I drained them, then added them to my food processor with some chicken broth, fat free cream cheese, and a couple tablespoons of butter. Blend it all until smooth, season with salt and pepper, and you’re good to go.

In a large casserole dish (I used an oval casserole dish), place the beef mixture (with pan juices). Top with the potato/parsnip puree, then grate on about 2 tablespoons of parmesan cheese.

The whole thing goes into a 400 degree oven for about 20-30 minutes, until it’s hot and bubbly and the top is lightly browned.

picsart_01-04-11-57-41

And this is the beauty you get once it’s finished – deeply flavorful ground beef and veggies with a little red wine gravy topped with creamy and velvety potato-parsnip puree. So creamy and delicious, you’ll have a hard time believing it’s an E!

Clean Eating Shepherds Pie (THM E)

  • Servings: 6-8
  • Difficulty: Easy
  • Print


Credit: Erin Murray, My Fling with Food

Ingredients

  • 1lb lean ground beef (96% or higher)
  • 8 oz cremini mushrooms, diced
  • 2 large carrots, peeled and diced
  • 3 small stalks of celery, diced
  • 1 large shallot, finely minced
  • 2 large cloves garlic, minced
  • 1/2 small red onion, diced
  • 1 c frozen peas
  • 3/4 c dry red wine
  • 1/8 tsp xanthan gum
  • 1 tsp Herbes de Provence
  • 3 Tbsp fresh chopped parsley
  • 2 sprigs fresh thyme, leaves removed
  • 5 medium white sweet potatoes, peeled and diced
  • 2 large parsnips, peeled and diced
  • 2 Tbsp fat free cream cheese
  • 1/2 c low sodium chicken broth, divided
  • 2 Tbsp butter
  • 2 Tbsp parmesan cheese
  • salt and pepper
  • coconut oil spray

Directions

  1. Preheat oven to 400 degrees.
  2. In a large sauce pot, cover the potatoes and parsnips with water, cover, and bring to a boil. Once they’re boiling, add a generous handful of salt and continue cooking for 10-12 minutes until very tender.
  3. Spray a large saute pan with coconut oil and heat on medium. Saute the ground beef and season with salt and pepper. Cook for about 5 minutes, breaking the beef down into bite-size chunks.
  4. Add the celery, carrots, mushrooms, shallots, garlic, onion, and Herbes de Provence. Saute for about 5-7 minutes, until the veggies become tender.
  5. Sprinkle the mixture with the xanthan gum, add the red wine, 1/4 c of the chicken broth, and simmer for about 7 minutes, until the liquid is reduced by about half.
  6. Turn off the heat, stir in the peas, parsley, and thyme, and set aside.
  7. Transfer the cooked and drained potatoes and parsnips to a food processor. Add the rest of the chicken stock, cream cheese, butter, salt and pepper. Blend into a smooth puree.
  8. Add the beef mixture into the bottom of a large casserole dish. Top with the potato puree, sprinkle with parmesan cheese. Bake at 400 for about 20-30 minutes, until the top is lightly browned.

Nacho Stuffed Jack-O-Lanterns

More Halloween fun up ahead!

My kids love burritos. There’s something about toddlers and finger foods – they’re made for one another. So, I wanted to do some things which the kids could enjoy (and actually eat) while being festive for the adults.

Enter jack-o-lanterns.

20161022065512_img_1929

Now, I am not an artist. When I say that, I mean I’m doing pretty well to draw in a straight line. Really all you need for these cuties is a sharp paring knife. Don’t worry about it being perfect, because you’ll see the overall idea in the end instead of minute details.

My kids enjoyed this recipe wrapped up in a tortilla, and the adults were able to enjoy it as stuffed peppers. The recipe may stretch to 6 servings if you’re serving little ones as well.

A few notes about this recipe: You’ll notice I do not re-bake the peppers after stuffing them. For one, I wanted to save time, and another is I was afraid the mixture would ooze out of the holes in the peppers. Appropriate for Halloween, yes, but not very pretty to look at. You’ll also notice that I measure the nacho seasoning in “palmfuls.” A palmful equals roughly a tablespoon. I make this or other seasonings so often I just don’t bother with the exact measurements anymore. Cooking is an experiment anyway, right? Have some fun with it. 😉

Nacho Stuffed Jack-O-Lanterns (THM S)

  • Servings: 4-6
  • Difficulty: Easy
  • Print


Credit: Erin Murray, My Fling with Food

Ingredients

  • 4 orange bell peppers, stems in tact with seeds and ribs removed and a festive face added
  • 1 1/2 – 2lbs ground beef
  • 1 medium red onion, finely diced
  • 1 15oz can mild fire roasted tomatoes with green chiles, with liquid drained
  • 1 c chopped cremini or white button mushrooms
  • 1 anaheim chile pepper, seeded and chopped (red jalapeno, it’s more mild than green)
  • 1 8oz block cream cheese
  • 2 palmfuls chili powder
  • 1 1/2 palmfuls smoked paprika
  • 1 palmful ground coriander
  • 1 palmful cumin
  • 2 pinches dried oregano
  • 1 pinch red pepper flakes
  • salt and pepper
  • Toppings: verde salsa, red salsa, queso, cheddar, lettuce, sour cream, etc.

Directions

  1. Preheat oven to 350. While the oven is heating, place the bell peppers (not tops) in the oven to soften. No spray or seasoning necessary at this point. You just want the peppers to soften.
  2. In a small bowl, mix together the chili powder, paprika, coriander, cumin, oregano, red pepper, salt, and pepper.
  3. Preheat a large, deep skillet over medium heat with 2 tsp of coconut oil. Saute the onion, chile, and mushrooms over medium heat until they start to soften. Add the ground beef, salt and pepper, and saute until beef is cooked through.
  4. Add the drained tomatoes and cream cheese and cook until the cheese melts into the beef mixture.
  5. Take the peppers out of the oven, season with salt and pepper, then carefully fill with the beef mixture. Decorate with the stem tops and serve with your favorite nacho toppings.

20161022070102_img_1931

Happy Haunted Halloween!

THM Mummy Dogs

It’s no secret that I love Halloween. This is my favorite time of year! And I’m letting it shine in my food.

20161017080921_img_1915

Mummy Dogs (THM S)

Serves 4-6

  • 1 package of all-beef uncured hotdogs (I used an 8-ct from Trader Joe’s)
  • 1 1/2 c shredded mozzarella cheese (packaged is fine! I used Kirkland brand)
  • 2 Tsp cream cheese
  • 1 egg
  • 3/4 c almond flour
  • 1/2 tsp garlic powder
  • 1 tsp dried parsley
  • pinch of salt and pepper
  • googly eye candies for decoration (optional, not for consumption ^_~)

Preheat oven to 425.

Begin by removing the dogs from their package and scoring them a few times on two sides. Place them in a medium-sized skillet (I used cast iron), and brown them on all sides over medium heat. NOTE* I like a crispy dog. You can skip this, if you like, as they will go into the oven. I just like the extra layer of flavor a crispy dog provides.

Prepare the dough by placing the mozzarella and cream cheese in a medium-sized microwave safe bowl. Microwave them for about a minute, stir, then let it go for another 30 seconds.

The mixture will  be HOT. Stir it with a spatula or a large wooden spoon. Add the egg, almond flour, and seasonings. Wet your hands slightly, and press the dough out to a 10-in round (don’t worry about it being perfect). Cut mummy “strips” with a pizza cutter (about 1/2 – 3/4 in.). Roll the strip between your fingers (like you would Playdoh, back in the day) and wrap your dog with the mummy strip. NOTE* If you have an 8-ct package, you likely won’t use all the dough. You can roll some up and bake it as garlic knots or make yourself a mini flatbread.

Place on a parchment-lined baking sheet and bake for 8-10 minutes, or until lightly browned.

These were so fun! My kids loved them, and it came together fairly quickly. An easy crowd-pleaser, if I do say so. They also warm up beautifully the next day in lunches.

MYOTO: Broccoli Beef Stir Fry

Stir fry is one of my weeknight faves – it’s always quick, easy, and tasty. What more can you ask for?

20160926071916_img_1615

Broccoli Beef Stir Fry (THM S)

  • 1.5-2lbs skirt steak, sliced thin
  • 1lb bag frozen broccoli florets
  • 1 medium red onion, thinly sliced
  • 1/3 c thinly sliced red bell pepper
  • 1/3 c soy sauce or Bragg’s liquid aminos
  • 1 Tsp rice vinegar
  • 1 tsp sesame oil
  • 2 cloves garlic, grated
  • 1/2 in fresh ginger, grated
  • 1/4 tsp xanthan gum
  • salt and pepper

Heat a large skillet over high heat and spray with coconut oil. Toss the sliced steak with salt and pepper and fry in a single layer on both sides. Remove the steak to a plate.

Add the frozen broccoli to the same pan where you cooked the steak, and cover to steam for about 4 minutes. Add the peppers and onions and continue steaming another 2-3 minutes.

In a small bowl, whisk together the soy sauce, rice vinegar, sesame oil, garlic, ginger, xanthan gum, and a little pepper.

Add the steak back into the pan with the prepared sauce and heat through until the sauce begins to thicken (about 3-4 minutes).

20160926071956_img_1618

Served with steamed cauliflower rice, top with Sriracha (if you like), and devour.

Steakhouse Dinner for 2

This post contains affiliate links, which means I receive a commission off of purchases made using these links. If you’re interested in fitness, the Trim Healthy Mama lifestyle, or just living a more healthy life, please consider using one or more of the links below. The money made helps me feed my growing family and keeps this blog running with free recipes. Thank you!

I have a love-hate relationship with Mondays at the grocery store for two reasons: 1) the produce is pretty heavily picked over, and 2) there are tons of manager specials on meat.

I love a good discount shelf! You can find some gems you otherwise wouldn’t think of, or are too expensive at their regular price.

A lot of times, steak comes with a hefty price tag.

20160829065843_IMG_1210

My husband and I love our date nights, but we like to be more relaxed on our dates and head to our favorite bar, unless it’s a special occasion. With 2 toddlers in tow, it’s not like we can (or even want) to venture out to a steakhouse on a regular night with the family.

Brandon loves his ribeye, and it’s his steak of choice whenever we go to steakhouses. When I saw ribeyes on manager special, I was jumping for joy (on the inside, of course. I was already dancing to music  – adding leaping to that would’ve gotten some stares).

Ribeye has really great flavor on its own because of all the marbling. A very tasty and underrated cut of beef, if you ask me. So, I decided to keep it simple by seasoning the steak itself with only salt and pepper (a great cut of beef doesn’t need a whole bunch of fluff), then topping the finished product with herbed compound butter for richness and flavor.

One of the best tips I learned about cooking steak was to let the meat rest on the counter prior to cooking. This helps take the chill off of the meat, so that when it hits the hot pan it won’t seize up and become tough.

Also, it’s hard to go wrong with steak if you cook it in a cast iron skillet. Cast iron will give you an even sear and cook throughout, while keeping a steady temperature. Plus, it’s a single pan that can do the work of the stove and the oven – winner!

I served with simple steamed asparagus (Brandon’s fave) and mashed cauliflower that I topped with crumbled bacon. For my mashed cauliflower recipe, look here. You can even shake it up, and make it even FANCIER, by doing a Wedge Salad with Homemade Buttermilk Ranch.

This meal is a super simple way to have an affordable, yet fancy, date night at home with your sweetie.

Top it off with quick and easy truffles for dessert, and that is one romantic weeknight.

Seared Steaks with Compound Butter (THM S)

  • Servings: 2
  • Difficulty: Easy
  • Print


Credit: Erin Murray, My Fling with Food

Ingredients

  • 2 ribeye steaks, bone in or out – your choice
  • 2 Tbsp softened butter (usually I go for unsalted, but I used Kerrygold in this recipe which has salt in it. If yours has salt, don’t add salt to it. If no salt, then add a pinch.)
  • 1 Tbsp fresh chopped rosemary, plus more whole sprigs for cooking
  • 1 Tbsp fresh chopped parsley
  • 1-2 cloves garlic, grated finely (I use a fine hand grater to ensure there are no large pieces of raw garlic.)
  • salt and pepper

Directions

  1. Preheat oven to 350.
  2. Combine butter, pepper, chopped rosemary and parsley, and garlic in a small bowl and stir. Place in the fridge to harden.
  3. Let steaks rest on the counter for at least 10 minutes prior to cooking.
  4. Preheat a large cast iron skillet over medium heat. Season the steaks liberally with salt and pepper on all sides. Place the steaks into the preheated skillet. Let them sear on the first side for 2-3 minutes. When you begin to see a good sear, flip them over, add a pat of regular, unseasoned butter to each steak and place whole sprigs of rosemary on top. Place the whole pan into the oven to finish cooking. Mine were in there for about 6 minutes, which achieved a perfect medium.
  5. Once they come out, let the meat rest in the pan another 5 minutes. Place the steaks onto plates, and top with a scoop of compound butter.

Smokehouse Cowboy Burgers

Burgers are so much fun! If you have a husband who may not be fully on board with Trim Healthy Mama, just serve him this and tell him everything will be OK.

20160824065624_IMG_1145

Smoky Sriracha Barbecue Sauce (THM FP)

  • 1 6oz can tomato paste
  • 1 Tsp blackstrap molasses
  • 1 Tsp GF Worcestershire sauce
  • 1 1/2 tsp onion powder
  • 1 1/2 tsp garlic powder
  • 2 tsp smoked paprika
  • 5 dashes liquid smoke
  • 2 Tsp apple cider vinegar
  • up to 1 Tsp Sriracha, or hot sauce
  • salt and pepper
  • 2 1/2 -3 c water

Combine all ingredients in a medium sauce pot, bring to a boil, and reduce to simmer over low heat for about an hour. When it’s reduced to the consistency you like, test for seasoning and adjust as needed.

Vidalia-Bacon Jam (THM S)

  • 1 vidalia onion, diced
  • 1 12oz package bacon, diced
  • 1 tsp blackstrap molasses
  • 1 c whiskey (I used Evan Williams)
  • salt and pepper

Add diced onion to a dry cast iron skillet over medium heat. Simmer until onions are golden brown and slightly tender. Add salt, pepper, molasses, and bacon. Continue simmering until bacon is cooked. Add whiskey, continue simmering until alcohol is cooked off and mixture is reduced by about half.

Remove from the heat and set it aside to cool slightly. Add mixture to a food processor and pulse until a loose paste forms. Put it in a small bowl and let stand at room temperature.

Cowboy Burgers (THM S)

  • 1 1/2 lbs 85% beef
  • 1 Tsp GF Worcestershire sauce
  • 10 dashes hot sauce
  • 1/2 tsp season salt (Your favorite sugar-free blend, I like something with garlic and celery salt)
  • 1/2 tsp chipotle chile powder
  • 1 egg

Place all ingredients in a medium bowl, and combine with your hands until the mixture just comes together. Form 4-5 patties, denting in the middle to prevent ballooning.

Place a cast iron pan or griddle over medium heat. Place the patties on the pan one by one, and leave them alone! No squishing, rearranging, or anything. Leave them alone for a good 2-3 minutes. When you start to see a good sear on the underside, flip them over, add cheddar cheese slices, and cook another 2-3 minutes. NOTE* I lightly vented my patties with a big lid and a splash of water to get the cheese fully melted.

Remove the burgers from the heat, add bacon jam and barbecue sauce. You can keep this bunless on pile it high on some romaine, or you can do an S-friendly bun.

20160824065656_IMG_1149


Kabobs & Cauli

Summertime is for grilling! And what better way to get in the spirit of grilling than a good kabob?

20160719063807_IMG_1008

Grilling, to me, means you get more flavor in less time. This is definitely part of my Dad’s personality in me, but I LOVE a good char. It makes food more appealing to the eye, and adds depth of flavor. I don’t have an outdoor grill, but my cast iron grill certainly gets the job done.

Where I struggle is sides!

So, as I was flipping through my Barefoot Contessa cookbook I came across an herbed rice recipe. The concept may be simple, but let me tell you the flavor is awesome.

I decided to swap her jasmine rice for cauliflower rice (gluten free and low carb, score!) and I added sliced almonds for a little crunch. I’ll tell you, the almonds aren’t completely necessary but they do add a nice textural component.

Since it’s not necessary for my creatures and husband to be low carb, I added some steamed brown rice to theirs for balance. Just because momma doesn’t eat the carbs doesn’t mean everyone has to do without – they are growing creatures, after all.

20160719063824_IMG_1010

Beef Kabobs with Herbed Cauliflower Rice (THM S)

  • 1-1.5lbs beef sirloin steak, cubed
  • 2 Tsp soy sauce, or liquid aminos
  • Juice of 1 lime
  • 2 tsp Worcestershire sauce
  • Veggies of choice: cherry tomatoes, red onion, bell pepper, eggplant, zucchini, mushrooms, etc.)
  • 1 small head cauliflower
  • 2 Tsp butter
  • 2 Tsp fresh chopped parsley
  • 1 Tsp fresh chopped dill
  • 1 scallion, thinly sliced
  • Small handful of sliced toasted almonds (Optional)
  • Salt and pepper
  • EVOO

Start by marinating the steak. Into a large gallon bag, add the soy sauce, lime juice,  Worcestershire, and pepper. Squish with your hands to combine, then add the steak cubes, zip the bag shut, and massage the marinade into the steak. Set aside in the fridge until 10 minutes before cooking.

*If you’re cooking these kabobs over an outdoor grill, be sure to soak your wooden skewers in water for the afternoon. It helps them not to burn on the grill.

Once you’re ready to assemble the kabobs, take the steak out of the fridge and begin cubing your veggies. I like big pieces, so I kept everything around an inch. If you’re using eggplant, skin the eggplant before cubing it.

Before skewering the veggies, place them into a small bowl and drizzle with EVOO, salt and pepper. Toss with your hands to combine.

I like to put the meat on skewers with slices of onion and bell pepper, and put the other vegetables on skewers together. You want to put things that have the same cooking time on skewers together, that way it all cooks evenly.

For the rice, cut the cauliflower into large pieces, and pulse it in a food processor until desired consistency. Place the crumbles into a microwave safe bowl, cover with a damp paper towel, and cook for 7-8 minutes. (For a higher-powered microwave, this time will be less, so go for a few minutes at a time.) Take it out, add the butter, salt and pepper, toss to combine. When rice has cooled slightly, add the herbs and almonds.

Preheat your grill to medium heat, spray it lightly with coconut oil, and lay the kabobs in one even layer. Then…LEAVE THEM ALONE. You want beautiful grill marks, and slight softening on the veggies. Step away from the grill! Cook the rice while you do this. Turn after a good 4-5 minutes (on the steak, more like 3 minutes for medium pinkness).

When all the kabobs are cooked, scoop a big helping of cauli rice onto your plate and follow with a few kabobs.

20160719064050_IMG_1011

Dive right in!