Chorizo & Veggie Egg Bake (THM S)

This post contains affiliate links, which means I receive a commission off of purchases made using these links. If you’re interested in fitness, the Trim Healthy Mama lifestyle, or just living a more healthy life, please consider using one or more of the links below. The money made helps me feed my growing family and keeps this blog running with free recipes. Thank you!

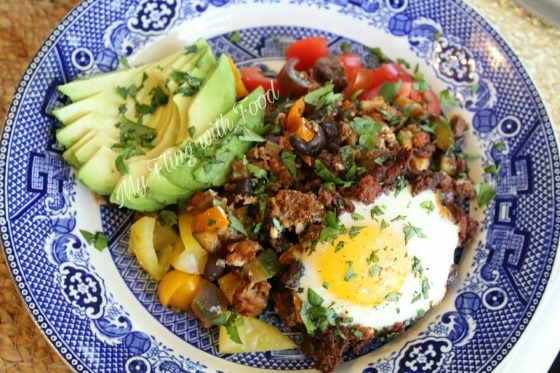
I love when I can make a large, family-style breakfast without a whole bunch of effort. This chorizo-egg bake is great for breakfast, brunch, lunch, or dinner (BBLD) and it’s a crowd pleaser.

PicsArt_04-08-10.49.12

Chorizo is my husband’s favorite, and sometimes I like for breakfast to have a little kick. It’s a spiced Mexican sausage you can find in bulk, or in casing. I like buying my sausage in bulk, so I have more choices as to its use. If you like something more mild, regular breakfast sausage will do just fine.

This is a great make ahead meal – I actually browned the sausage and veggies the night before, so the next morning all I had to do was heat up the oven and plop some eggs on top.

Usually I’ll make something like this as a frittata or casserole, but I enjoyed doing the baked whole eggs because it cooked a lot of eggs at once, and I still got to have runny yolks (which are my FAVORITE). You could also do this in individual ramekins using the same method.

Brown the sausage, zucchini, radishes, and bell pepper together in a big skillet until the sausage is cooked through. Stir in the black beans, then transfer to a baking dish and cool slightly.

20170401195726_IMG_2988

Make valleys in the meat mixture with the back of a spoon, so the eggs have a place to sit.

20170401195827_IMG_2989

Place the eggs on top and season with a little salt and pepper.

20170401200157_IMG_2992

Bake at 400 for about 25 minutes, or until the egg whites are set.

20170401204043_IMG_2994

Nom!

I served this over some chopped rainbow tomatoes and sliced avocados, but there are many more possibilities. Top with fresh pico de gallo, guacamole, sour cream, cheese, or any other S-friendly topper your mind can dream up.

20170401202048_IMG_2993

Top with some fresh chopped cilantro, and you’re ready to serve!

PicsArt_04-08-10.54.16

My favorite part about this whole meal…

PicsArt_04-08-11.05.41

That beautiful, runny yolk coating the sausage and veggies, making its own little sauce.

The sausage lends a little spice, while you get some crunch with the veggies, and the fresh avocado cools it all down.

This egg bake will please the whole family!

Chorizo and Veggie Egg Bake (THM S)

  • Servings: 6
  • Difficulty: Easy
  • Print


Credit: Erin Murray, My Fling with Food

Ingredients

  • 1lb bulk chorizo sausage (or other breakfast sausage)
  • 1 medium zucchini, diced
  • 1/2 bunch radishes, diced
  • 1/2 bell pepper, diced
  • 1 c black beans, drained and rinsed (sub cubed sweet potatoes for paleo, or additional vegetable)
  • 1/2 Tbsp smoked paprika
  • 1 Tbsp ground coriander
  • few dashes of hot sauce
  • 6 eggs (or one egg per person)
  • fresh chopped cilantro
  • Toppings of choice: pico de gallo, sour cream, cheese, avocado, etc.
  • salt and pepper

Directions

  1. Preheat oven to 400.
  2. Brown the sausage and veggies with the paprika and coriander in a large skillet until sausage is cooked through and veggies are tender.
  3. Add the meat to one large, or several individual, baking dishes and make valleys in the meat mixture with the back of a spoon. Add the eggs in the valleys, and season with salt and pepper.
  4. Bake at 400 for about 25 minutes, or until egg whites are set.
  5. Top with fresh cilantro and serve immediately with toppings of choice.

Supreme Pizza Stuffed Zucchini Boats (THM S)

This post contains affiliate links, which means I receive a commission off of purchases made using these links. If you’re interested in fitness, the Trim Healthy Mama lifestyle, or just living a more healthy life, please consider using one or more of the links below. The money made helps me feed my growing family and keeps this blog running with free recipes. Thank you!

Pizza night is easily my favorite night. The kids don’t complain. The husband doesn’t complain. Imagine my surprise when I traded our usual fathead pizza crust for zucchini, and STILL had a happy crowd. (Angels sang, trust me.)

PicsArt_04-07-03.08.39

Believe me when I say how much I love pizza made with fathead dough, but I don’t always want my meals to be so calorie-dense. Plus, having a lot of dairy at once can feel really heavy, whereas the zucchini makes your meal lighter (and adds veggies!).

The supreme pizza ingredients I chose were pepperoni, hot Italian sausage, sliced mushrooms, and diced green bell peppers. If you like a different combination – use it! I found this to be very tasty, and I’m sure you will too.

Start by cutting the tops off your zucchini, slicing in half lengthwise, and scooping out the middle/seeds. This is the part of the zucchini that’s heavy with water, you want to remove it so that your pizza isn’t watery. And, obviously, you need a place for those yummy toppings to go!

20170328072804_IMG_2945

It was easy to carve these boats with a mini ice cream scoop. It gave me a nice, round shape, and I could really dig in to the zucchini to create a deep boat.

Next arrange them in your dish. I got the most bang for my buck by alternating the tops and bottoms, like so. [My 9×13 baking dish was perfect for 7-8 zucchini boats.]

20170328073208_IMG_2946

Next, salt and pepper your boats, then paint the inside with marinara sauce (store bought or homemade).

Now it’s time to pile in the toppings! I did cooked crumbled sausage on the bottom, then mushrooms and bell peppers, a layer of cheese,  topped with pepperoni, and piled on more cheese and seasoning.

I like hugging the pepperoni with cheese because 1) it helps the ingredients stick together and 2) I love crispy pepperoni. I used both mozzarella and Romano cheese for the topping, because I like the differing flavors. I also sprinkled the tops with a little dried Italian seasoning, for an extra flavor boost.

Pop the boats into a 375 degree oven, covered with foil, for about 25 minutes. Remove the foil and continue cooking (or broil on low, like I did for crispy pepperoni) until the tops are browned and bubbly.

PicsArt_04-07-03.16.09

Mmm, look at those beautifully brown tops!

PicsArt_04-07-03.11.05

These boats were a fantastic, light and filling dinner. I wanted to add even more green to my plate, so I enjoyed two with a side salad. My kids enjoyed their boats minus the spicy sausage. My husband (zucchini hater extraordinaire) had three. THREE! I almost died of shock.

This meal was so fresh and easy, it almost felt illegal (ha!). I hope your family enjoys these as much as mine!

Supreme Pizza Stuffed Zucchini (THM S)

  • Servings: 4+
  • Difficulty: Easy
  • Print


Credit: Erin Murray, My Fling with Food

Ingredients

  • 4 medium zucchini (for more than 4 people, add 1 whole zucchini per person)
  • marinara sauce
  • 1/2 lb of mild or hot Italian sausage
  • 1/4 lb of sliced pepperoni
  • 1/2 c sliced mushrooms
  • 1/2 green bell pepper, finely diced
  • mozzarella and Romano cheese
  • dried Italian seasoning
  • salt and pepper

Directions

  1. Preheat oven to 375.
  2. Cut the tops off the zucchini, halve lengthwise, and carve out the middles.
  3. Season the boats with salt and pepper and paint the insides with marinara.
  4. Arrange the toppings: sausage on the bottom, peppers and mushrooms, mozzarella, pepperoni, more mozzarella, Romano cheese, and a sprinkle of dried Italian seasoning.
  5. Cover with foil, and bake for about 25 minutes.
  6. Remove the foil, and continue baking (or broil on low) until the tops are browned and bubbly.

Sunday Bolognese (THM S)

This post contains affiliate links, which means I receive a commission off of purchases made using these links. If you’re interested in fitness, the Trim Healthy Mama lifestyle, or just living a more healthy life, please consider using one or more of the links below. The money made helps me feed my growing family and keeps this blog running with free recipes. Thank you!

Bolognese is basically an Italian meat sauce. It has a different flavor than traditional marinara, and usually has some vegetables in it as well. I call this my “Sunday Sauce” because you can make it on Sunday, and it tastes just as good (or better!) on Friday.

picsart_02-26-11-56-09

This sauce comes together in one, big pot on your stove top, and it’s low-maintenance (lots of simmering, not a ton of stirring).

When I make Bolonese, I always make extra for freezing. It’s perfect with Dreamfields Noodles, spiralized squash/zucchini, eggplant steaks, Lazy Lasagne (Trim Healthy Mama Cookbook page 140), or any other Italian fare you can dream up. My kids love this sauce, and will eat anything I put with it.

Start with 1 1/2 – 2lbs ground beef. I used 85% lean, but you can go for whichever variety your family likes best. Sauté it with salt, pepper, garlic powder, and some dried basil. When the meat begins to brown, start breaking it up with the back of a wooden spoon or spatula. When the meat is mostly cooked, add the shallots, garlic, celery, grated carrot, and onions. I use a fine hand grater to get small strings of grated carrot. The best thing about using a hand grater, as opposed to a box grater, is that you can hover it over the pot and grate straight down into it. No extra step of transferring it from the cutting board to the pot. Plus, when it’s cut that small there’s no need for peeling.

When the vegetables begin to soften, de-glaze the pan with one heaping cup of red wine. Don’t fall for the “cooking wine” tricks here – you want to use something dry, bold in flavor, and that you would enjoy drinking. If you don’t enjoy the taste of it uncooked, then you really won’t like it once it’s reduced and concentrated. I used a Côtes du Rhône because I still had some left over from my Coq Au Vin, and it was just enough for this recipe. The Côtes du Rhône gave my sauce a bold, deep flavor, and I highly suggest it if you can find it in your grocery store. (I found mine at Costco for around $10).

Finally, add the whole can of crushed tomatoes with their juice and a touch more salt and pepper. Place the lid on your pan, and let it simmer on medium heat for about 10-12 minutes. Then remove the lid and continue simmering until sauce is reduced and thickened.

Turn off the heat, taste and adjust for seasoning, then add one large handful of fresh chopped parsley.

picsart_02-26-11-58-38

What you end up with is a bold, hearty, sauce that’s slightly fruity from the red wine. It’s perfect to use right away, or you can cool and package it up for Italian night later in the week (all it will need is some heat). Like I said earlier, this sauce only gets better with time, so there are no disappointing leftovers here.

Sunday Bolognese (THM S)

  • Servings: 6-8
  • Difficulty: Easy
  • Print


Credit: Erin Murray, My Fling with Food

Ingredients

  • 1 1/2 – 2lbs ground beef (I used grassfed 85% lean)
  • 1 heaping cup dry red wine
  • 1/2 small onion, diced
  • 1 large stalk celery, finely diced (leafy greens included)
  • 1/2 medium carrot, finely grated
  • 2 cloves garlic, minced
  • 1 small shallot, minced
  • 1 28-oz can crushed tomatoes with basil
  • 1 large handful chopped fresh flat leaf parsley
  • 1/2 tsp garlic powder
  • 1 tsp dried basil
  • salt and pepper

Directions

  1. Start by browning the ground beef in a large skillet over medium heat, breaking it up with the back of a wooden spoon or spatula. Season with garlic powder, dried basil, salt, and pepper.
  2. Add the onions, shallots, garlic, celery, grated carrot, and a touch more salt and pepper. Continue sautéing until onions begin to get soft, about 5-6 minutes.
  3. De-glaze the pan with the red wine, then add the crushed tomatoes and a little more salt and pepper. Cover and let simmer over medium heat for about 10-12 minutes. Remove the lid and continue simmering another 10 minutes, until sauce is thickened and slightly reduced.
  4. Turn off the heat, add the parsley, taste and adjust for seasoning. Serve immediately, or cool and store until future use.

Clean Eating Shepherds Pie (THM E)

This post contains affiliate links, which means I receive a commission off of purchases made using these links. If you’re interested in fitness, the Trim Healthy Mama lifestyle, or just living a more healthy life, please consider using one or more of the links below. The money made helps me feed my growing family and keeps this blog running with free recipes. Thank you!

Only in my recent years I’ve come to have a love for shepherds pie. It wasn’t a dish I grew up with, but it’s grown into being a Winter staple in my household. It’s easy to prepare, uses simple ingredients, and can feed an army.

picsart_01-04-11-53-37

I started this pie using low fat, grass-fed ground beef. It’s not traditional for a shepherds pie, however it lends a lot of great flavor. I then sautéed it with a little red onion, celery, cremini mushrooms, carrots, shallots, and garlic. I sprinkled the mixture with a little xanthan gum, then de-glazed the pan with about a cup of dry red wine and reduced the mixture for about 7 minutes.

When the wine is reduced by about half, turn the heat off, add the peas, parsley, and thyme then set aside.

Meanwhile, I had my creamy potato topping going in a separate pan.

I peeled and diced 5 medium white sweet potatoes. Yes, these things exist! I found them bagged at Trader Joe’s – they have purple skin and white flesh. I also peeled and diced two large parnsips to go with it. Parsnips have a slightly spicy flavor, which helps cut the sweetness of the sweet potato and they make for a very velvety puree.

I boiled those down together for about 12 minutes, in salted water, so that everything was nice and tender.

I drained them, then added them to my food processor with some chicken broth, fat free cream cheese, and a couple tablespoons of butter. Blend it all until smooth, season with salt and pepper, and you’re good to go.

In a large casserole dish (I used an oval casserole dish), place the beef mixture (with pan juices). Top with the potato/parsnip puree, then grate on about 2 tablespoons of parmesan cheese.

The whole thing goes into a 400 degree oven for about 20-30 minutes, until it’s hot and bubbly and the top is lightly browned.

picsart_01-04-11-57-41

And this is the beauty you get once it’s finished – deeply flavorful ground beef and veggies with a little red wine gravy topped with creamy and velvety potato-parsnip puree. So creamy and delicious, you’ll have a hard time believing it’s an E!

Clean Eating Shepherds Pie (THM E)

  • Servings: 6-8
  • Difficulty: Easy
  • Print


Credit: Erin Murray, My Fling with Food

Ingredients

  • 1lb lean ground beef (96% or higher)
  • 8 oz cremini mushrooms, diced
  • 2 large carrots, peeled and diced
  • 3 small stalks of celery, diced
  • 1 large shallot, finely minced
  • 2 large cloves garlic, minced
  • 1/2 small red onion, diced
  • 1 c frozen peas
  • 3/4 c dry red wine
  • 1/8 tsp xanthan gum
  • 1 tsp Herbes de Provence
  • 3 Tbsp fresh chopped parsley
  • 2 sprigs fresh thyme, leaves removed
  • 5 medium white sweet potatoes, peeled and diced
  • 2 large parsnips, peeled and diced
  • 2 Tbsp fat free cream cheese
  • 1/2 c low sodium chicken broth, divided
  • 2 Tbsp butter
  • 2 Tbsp parmesan cheese
  • salt and pepper
  • coconut oil spray

Directions

  1. Preheat oven to 400 degrees.
  2. In a large sauce pot, cover the potatoes and parsnips with water, cover, and bring to a boil. Once they’re boiling, add a generous handful of salt and continue cooking for 10-12 minutes until very tender.
  3. Spray a large saute pan with coconut oil and heat on medium. Saute the ground beef and season with salt and pepper. Cook for about 5 minutes, breaking the beef down into bite-size chunks.
  4. Add the celery, carrots, mushrooms, shallots, garlic, onion, and Herbes de Provence. Saute for about 5-7 minutes, until the veggies become tender.
  5. Sprinkle the mixture with the xanthan gum, add the red wine, 1/4 c of the chicken broth, and simmer for about 7 minutes, until the liquid is reduced by about half.
  6. Turn off the heat, stir in the peas, parsley, and thyme, and set aside.
  7. Transfer the cooked and drained potatoes and parsnips to a food processor. Add the rest of the chicken stock, cream cheese, butter, salt and pepper. Blend into a smooth puree.
  8. Add the beef mixture into the bottom of a large casserole dish. Top with the potato puree, sprinkle with parmesan cheese. Bake at 400 for about 20-30 minutes, until the top is lightly browned.

Easy S Thanksgiving for Four

Thanksgiving is right around the corner, it’s sneaking up on us faster than we know. It’s my first Thanksgiving being 100% on the Trim Healthy Mama plan. I know the THM plan gives us food freedom, in that we can always restart in three hours, but let me be completely  honest and say…I don’t like going off plan. After eating clean for so long, I find that when I do take tiny steps off plan I’m gravely disappointed. Then I’m dealing with the inevitable sugar spikes, and I don’t enjoy doing that to myself.

That’s why I wanted to be ahead of the game, and get my holiday preparations in order well before the craze of the holidays begins.

Most of this meal came together in under an hour and, as many of us know, that’s a fraction of what is normally spent in the kitchen or even just prepping for turkey day. This meal is equal parts flavorful and low-key.

I made the cornbread 2 days prior to making the meal so that it could dry out some. If you like your dressing as more of a casserole, or even want to stuff your turkey breasts with it, you could certainly make it the morning of so that it’s more pliable.

I modified this recipe for the actual cornbread part of the dressing. I left out the bacon and cheddar, then added ground sage, a little poultry seasoning, salt, and pepper.

I went fairly simple with the turkey, pan roasting it in butter. I did this for two reasons: 1) turkey airs on the dry side, and there’s nothing I despise more than dry protein. 2) BUTTER. I got the herbes de Provence on a recent trip to Trader Joe’s, and love the blend! I highly suggest using it, but if you don’t have it you can of course use your favorite herb blend.

I topped off the meal with some creamy mashed cauliflower, and it was a real winner! My husband was excited to take the leftovers to work, and he’s not a big “leftovers” guy.

20161023080938_img_1937

Southern Style Cornbread Dressing (THM S)

  • Servings: 4-6
  • Difficulty: Easy
  • Print


Credit: Erin Murray, My Fling with Food

Ingredients

    For the cornbread:
  • 1/2 stick butter, softened
  • 1/4 c Nutiva shortening, or coconut oil/butter
  • 4 eggs
  • 1 c unsweetened, plain almond milk
  • 1/4 c masa cornmeal
  • 3/4 c almond flour
  • 1/4 c coconut flour
  • 1/2 tsp salt
  • 1 tsp baking soda
  • 1 tsp ground sage
  • 1/2 tsp ground poultry seasoning
  • sprinkle of black pepper
  • For the Dressing:
  • 1 loaf low carb cornbread, sliced in half lengthwise
  • 6 eggs
  • 3/4 c heavy cream (half and half or unsweetened plain almond milk will also work)
  • 1 1/2 c turkey stock
  • 3 stalks celery, finely diced
  • 1 medium red onion, diced
  • 3 cloves garlic, minced
  • 1 c diced cremini mushrooms
  • salt and pepper

Directions

  1. Preheat oven to 350, with your cast iron skillet in the oven while it heats.
  2. Mix all the ingredients for the cornbread together in a medium-sized bowl. Spray cast iron skillet with coconut oil, and pour the batter in. Bake for 30-35 minutes. When it’s finished, let the cornbread cool, then remove it from the skillet to dry out for 6-48 hours.
  3. Preheat oven to 375. Bake the halved cornbread for roughly 10-12 minutes. Cut into 1/2 inch cubes and set aside in casserole dish.
  4. Preheat a large, deep skillet over medium heat with 2 Tsp butter. Saute the onions, celery, and mushrooms for about 5-7 minutes, until soft. Add the garlic, salt, and pepper and cook an additional minute. Remove from the heat and add to the casserole dish with the bread cubes.
  5. Whisk together the eggs, milk or cream, and turkey stock, then pour over the bread mixture and stir.
  6. Bake uncovered for 35-40 minutes, or until lightly browned and crispy on top.

Butter Basted Pan Roasted Turkey (THM S)

  • Servings: 4
  • Difficulty: Easy
  • Print


Credit: Erin Murray, My Fling with Food

Ingredients

  • 2 large (roughly 1 lb each) turkey breasts, butterflied in half
  • 1 stick unsalted butter
  • about 1 Tsp herbes de Provence
  • salt and pepper

Directions

  1. Melt the butter in a large, deep skillet over medium heat.
  2. Season the turkey liberally with herbes de Provence, salt, and pepper. When the butter begins to bubble (not brown), gently add the turkey to the pan.
  3. Saute the turkey 3-4 minutes, or until golden brown. Flip, then turn the pan down to low heat to finish.
  4. Baste the cutlets along the way by gently tilting the pan towards you, spooning up the butter, and pouring it over the turkey.
  5. Saute about another 4-5 minutes, or until cooked through, then remove from the pan and cover with foil.

Turkey Gravy (THM FP)

  • Servings: 4
  • Difficulty: Easy
  • Print


Credit: Erin Murray, My Fling with Food

Ingredients

  • Pan drippings from cooking the turkey
  • 2 c turkey stock
  • 1 tsp Dijon mustard
  • 1 Tsp gluten free Worcestershire sauce
  • 1/4 tsp xanthan gum
  • salt and pepper

Directions

  1. In the same pan where you cooked the turkey (any residual butter removed), heated to medium, de-glaze the pan with the turkey stock working any bits from the bottom with a wooden spoon.
  2. Whisk in the mustard and Worcestershire, then heat until the mixture starts to lightly bubble.
  3. Whisk in the xanthan gum and a pinch of salt and pepper. Continue whisking occasionally until the mixture thickens to your liking. NOTE* Do not add any more xanthan gum, or the mixture may start to get gloppy (technical term). Be patient and keep whisking. It will thicken!

Nacho Stuffed Jack-O-Lanterns

More Halloween fun up ahead!

My kids love burritos. There’s something about toddlers and finger foods – they’re made for one another. So, I wanted to do some things which the kids could enjoy (and actually eat) while being festive for the adults.

Enter jack-o-lanterns.

20161022065512_img_1929

Now, I am not an artist. When I say that, I mean I’m doing pretty well to draw in a straight line. Really all you need for these cuties is a sharp paring knife. Don’t worry about it being perfect, because you’ll see the overall idea in the end instead of minute details.

My kids enjoyed this recipe wrapped up in a tortilla, and the adults were able to enjoy it as stuffed peppers. The recipe may stretch to 6 servings if you’re serving little ones as well.

A few notes about this recipe: You’ll notice I do not re-bake the peppers after stuffing them. For one, I wanted to save time, and another is I was afraid the mixture would ooze out of the holes in the peppers. Appropriate for Halloween, yes, but not very pretty to look at. You’ll also notice that I measure the nacho seasoning in “palmfuls.” A palmful equals roughly a tablespoon. I make this or other seasonings so often I just don’t bother with the exact measurements anymore. Cooking is an experiment anyway, right? Have some fun with it. 😉

Nacho Stuffed Jack-O-Lanterns (THM S)

  • Servings: 4-6
  • Difficulty: Easy
  • Print


Credit: Erin Murray, My Fling with Food

Ingredients

  • 4 orange bell peppers, stems in tact with seeds and ribs removed and a festive face added
  • 1 1/2 – 2lbs ground beef
  • 1 medium red onion, finely diced
  • 1 15oz can mild fire roasted tomatoes with green chiles, with liquid drained
  • 1 c chopped cremini or white button mushrooms
  • 1 anaheim chile pepper, seeded and chopped (red jalapeno, it’s more mild than green)
  • 1 8oz block cream cheese
  • 2 palmfuls chili powder
  • 1 1/2 palmfuls smoked paprika
  • 1 palmful ground coriander
  • 1 palmful cumin
  • 2 pinches dried oregano
  • 1 pinch red pepper flakes
  • salt and pepper
  • Toppings: verde salsa, red salsa, queso, cheddar, lettuce, sour cream, etc.

Directions

  1. Preheat oven to 350. While the oven is heating, place the bell peppers (not tops) in the oven to soften. No spray or seasoning necessary at this point. You just want the peppers to soften.
  2. In a small bowl, mix together the chili powder, paprika, coriander, cumin, oregano, red pepper, salt, and pepper.
  3. Preheat a large, deep skillet over medium heat with 2 tsp of coconut oil. Saute the onion, chile, and mushrooms over medium heat until they start to soften. Add the ground beef, salt and pepper, and saute until beef is cooked through.
  4. Add the drained tomatoes and cream cheese and cook until the cheese melts into the beef mixture.
  5. Take the peppers out of the oven, season with salt and pepper, then carefully fill with the beef mixture. Decorate with the stem tops and serve with your favorite nacho toppings.

20161022070102_img_1931

Happy Haunted Halloween!

Shrimp & Broccoli Spaghetti Squash Alfredo

Who doesn’t love a big bowl of stringy, cheesy goodness? 20161004062700_img_1738

Just look at it! This was a fairly easy meal to make, with most of the components coming together in under 30 minutes. (Glaring at you, spaghetti squash.)

Shrimp and Broccoli Alfredo (THM S)

  • 1lb jumbo shrimp, peeled and deveined with tails removed
  • 1 lb broccoli florets
  • 1 medium spaghetti squash
  • 1 c heavy cream
  • 1/2 stick butter
  • 1 c shredded mozzarella
  • 1 c shredded asiago (or parmesan)
  • 2 large cloves garlic, finely minced
  • S & P to taste

There are a few different methods to cooking spaghetti squash. You can halve it and throw it in a crockpot with some water on high for a few hours, until tender. I usually do it in the oven, at 400, for one hour. I halve and seed it, and place it cut-side down in a deep pan with about an inch of water. I make little cuts in the bottom of the squash to vent it, and that’s it. Cook it however you like!

In a large skillet, melt 1 Tsp of the butter over medium heat. Toss the shrimp with salt and pepper, and arrange them in the skillet in one even layer. Cook through on both sides, about 90 seconds. Remove them to a plate.

In the same skillet, heat another 2 Tsp of the butter over medium and add the garlic. Cook for one minute, then add the cream. Once the cream starts to bubble, whisk in the mozzarella. Once that’s melted, whisk in the asiago or parm and whisk until it’s all melted. Taste and season with salt and pepper as needed. Remove from the heat and set aside.

Once the spaghetti squash is cooled enough to handle. Scoop out the squash onto some paper towels, in one even layer. Place more paper towels on tops and press out as much water from the squash as you can. It will take a few rounds, but trust me you don’t want that beautiful alfredo sauce getting runny because of squash water.

Once the the squash is squeezed, add it to a large casserole dish with the last pat of butter and salt and pepper, toss to coat. Add the broccoli, season a little more and toss again. Finally, add the shrimp and sauce and toss to combine. Sprinkle the top with another hefty handful of cheese (mozzarella or asiago, or both!) and place it under a heated broiler until the cheese is hot and bubbly.

20161004062402_img_1735

Do you want to eat your screen right now? It’s OK. It’s every bit as tasty as it looks.

Seafood for a Crowd

I have been wanting to try this amazing seafood gratin recipe out of my Barefoot Contessa cookbook for sometime, but it’s honestly a little rich for my grocery budget.

It stars two of the highest-priced items in the seafood case: halibut and lobster.

Don’t get me wrong, I will splurge and get that stuff sometimes. [More so, I’ll scour the “Manager’s Special” shelves looking for them.] It’s just not something I’ll do all the time.

So, when I saw sprouts was having a major sale on both jumbo shrimp and fresh lobster, I decided to tweak it a little and go for it.

20160909073537_img_1244

Now, I really went for it on this recipe. I actually made my own seafood stock. I know. It’s not something you HAVE  to do. Did it enhance the flavor? Yes. Would vegetable stock or bottled clam juice do the same? Sure. It was really easy, honestly, and since you’ll have the shells/tails from the seafood anyway…why not put them to good use?

Cook the lobster by placing it belly-up on a small baking pan. Put a few pats of butter on top and season with salt and pepper. Bake at 375 for about 10-12 minutes, or until cooked through. Let it cool for at least 8-10 minutes before handling. Cut it right down the center with a sharp knife, and peel the meat away from the shell.

I made the stock by adding my shrimp shells and lobster tail to a few cups of my homemade scrap broth, and simmering over medium-low heat for about an hour. I skimmed out the shells, and voila! You have seafood stock.

You could even mix this up by adding in what you like: halibut, scallops, more lobster.

20160909073048_img_1243

Seafood Gratin (THM S)

  • 1 1/3 lbs jumbo easy-peel shrimp
  • 1 fresh lobster tail (raw, shell-on)
  • 1 c seafood stock (or substitutes from above)
  • 1 c half and half
  • 1/2 c plus a few Tablespoons of white wine
  • 3 Tsp tomato paste
  • 1/2 tsp saffron threads
  • 1 tsp xanthan gum
  • 3 strips of bacon, sliced
  • 2 stalks celery, diced
  • 1/2 red onion, diced
  • 1 small carrot, diced
  • 1/4 c fresh parmesan cheese
  • 2 Tsp fresh parsley
  • 2 cloves garlic, minced
  • 1 Tsp fresh tarragon
  • 1/2 – 1 c “bread”crumbs (I used crushed Parmesan Whisps (all cheese crackers). You can also use baking blend, pork rinds, or all cheese if you like.)

Preheat the oven to 375.

Prepare the sauce by combining stock, half and half, 1/2 c wine, tomato paste, and saffron in a small sauce pan. Bring to a boil, lower the heat to low and cook for about another 10-12 minutes, stirring frequently.

While that’s happening, add a few tablespoons of butter to a large skillet over medium heat. Add the onions, garlic, celery, and carrot and cook over medium heat for about 5 minutes. Season with salt and pepper, and add 3 Tsp of white wine to de-glaze the pan. Cook until the alcohol reduces off, about another 3 minutes.

In a large cast iron skillet, cook the bacon until crispy and remove it to a paper towel. Cook the shrimp in the bacon fat for about 90 seconds on each side, seasoned with a little salt and pepper. Place the bacon and cooked shrimp together with the cooked lobster.

After the sauce is reduced, whisk in the xanthan gum and continue whisking over low heat until sauce is thickened to desired consistency.  Remove from heat, and combine with cooked vegetables, bacon, and seafood.

Place the mixture into a large casserole or gratin dish. Top with crushed Parmesan Whisps (or other topping of choice), parmesan cheese, tarragon, and parsley. Bake for about 15-20 minutes, until the top is slightly browned.

20160909073542_img_1245

Lovely!

One-derful Dish

I hate doing dishes. Dishes are the bane of my existence. So, when I can make a meal that only uses one dish, and can go straight from the oven to the table – I am elated.

Balsamic and Mustard Glazed Pork with Roasted Vegetables (THM E)

  • 2-3lbs boneless pork tenderloin
  • 3 Tsp balsamic vinegar
  • 2 sprigs rosemary, leaves removed
  • 1 heaping tsp dijon mustard
  • 2 garlic cloves
  • 1 Tsp EVOO
  • salt and pepper
  • Mixed veggies of choice: I used zucchini, eggplant, carrots, leeks, and radishes

Preheat the oven to 450.

Combine the vinegar, EVOO, mustard, rosemary, garlic, salt and pepper in a food processor or blender cup (I used my Nutri Ninja cup, which worked perfectly) and pulse until rosemary is finely chopped.

Put the tenderloin into your roasting dish. Pour about half to 3/4 of the mixture over the pork and gently massage it into all sides. Place it in the oven to cook for 15 minutes.

While this is happening, chop your vegetables. If you can make your cuts similar in size, the vegetables will cook more evenly. Place them into a bowl with 1 Tsp EVOO, salt and pepper and toss to coat.

After the pork has cooked for 15 minutes, remove it from the oven and place the veggies all around the pork in your roasting dish. *NOTE: You don’t want a lot of extra space in your pan. Since these will cook for a while, if the vegetables are closer together there’s less chance of them burning.

Baste the pork with the leftover glaze, cover loosely with foil, turn the oven down to 350 and cook for 45-55 minutes. The pork is done when the internal temperature reaches between 145-160 degrees on an instant read thermometer.

When it comes out of the oven, sprinkle everything with fresh chopped parsley, and allow the pork to rest for 5-7 minutes. Slice and serve.

20160817063838_IMG_1130

You can switch this recipe up by using different vegetables. I love to use what’s seasonal (because it’s cheap!) and what I have on hand. P.S. if you’ve never tried roasting radishes before, you NEED to. They are so close in taste and texture to a potato, that you would never miss it’s high-carb cousin.

Other combinations that would be tasty: fennel and carrots; sweet potatoes, onions, and celery; radishes and carrots; or butternut squash and apples.

Enjoy this for a crowd or a few! It’s sure to please.

20160817063847_IMG_1131

Low Carb Bacon Leek & Tomato Quiche (THM S)

BLTs are one of my summer favorites. A classic combination that’s easy to put together – how can you go wrong?

PicsArt_08-03-08.47.05

This recipe is not at all complicated, but it does take time to cook. It’s one of those you want to make on Saturday afternoon for Sunday brunch, because it’s even better the next day. However, this recipe is an anytime meal good for breakfast, brunch, lunch, or dinner (BBLD).

My favorite part of this BLT quiche are the big, beautiful slices of tomato. There’s just nothing better than a fresh, local tomato in the summertime. Yes, BLTs are traditionally with lettuce, but trust me the leeks are an amazing flavor addition to this quiche.

The crust is definitely an unsung hero here as well. It’s every bit as sturdy, crispy, and buttery as a traditional high-carb crust.

PicsArt_08-02-10.33.09

For the crust, add the coconut flour, eggs, salt, EVOO, and butter to a food processor. Pulse the mixture until pea-sized balls form and turn the mixture out into your pie plate. Begin pressing the crust evenly into the bottom and up the sides of the dish.

For the filling, begin by browning the diced bacon in a llarge cast iron skillet. Remove the bacon from the pan, place it on a paper towel, and leave the fat in the pan.

Dice the leek (white and light green parts only) and add it to a small bowl of water. This helps get the grit and dirt out of the crevasses of the leek. shake out the pieces with your fingertips, and lift them out with your hands to a towel to dry them off. *NOTE: if you try to strain them through a colander the grit will follow. Just take my advice and lift them out of the water.

20160801061912_IMG_1079

Soften the leeks in the same pan with the bacon fat. Season lightly with salt and pepper, and saute for about 5-7 minutes or until softened. Set them aside and let them cool.

For the wet mixture, whisk together the eggs, yolk, cream, salt and pepper in a medium bowl. Gently fold in the cooled bacon and leeks, then pour the wet mixture into your prepared crust.

Dot the top with bleu cheese crumbles, and gently lay the sliced tomatoes over top. *NOTE: The bleu cheese really is a revelation in this quiche, but if it’s not your thing you can replace it with any cheese you like – mozzarella, parmesan, swiss, etc.

Bake the quiche at 375 for about 55 minutes to one hour. The top of the quiche will be golden, and the center will be just set.

Let the quiche stand for at least 20 minutes before serving (if serving warm). If you’re making this ahead of time, let it cool completely to room temperature then place it in the fridge until you’re ready to eat.

The crust is golden, crispy, and slightly sweet which perfectly holds the creamy filling. The bacon adds a slightly salty flavor which perfectly balances the tangy, yet sweet bleu cheese and fresh tomato.
PicsArt_08-03-09.02.37

This post contains affiliate links, which means I receive a commission off of purchases made using these links. If you’re interested in fitness, the Trim Healthy Mama lifestyle, or just living a more healthy life, please consider using one or more of the links below. The money made helps me feed my growing family and keeps this blog running with free recipes. Thank you!

Bacon Leek & Tomato (BLT) Quiche (THM S)

  • Servings: 8
  • Difficulty: Easy
  • Print


Credit: Erin Murray, My Fling with Food

Ingredients

    Crust:
  • 2 eggs
  • 2 Tbsp EVOO
  • 1/4 tsp salt
  • 1 c coconut flour
  • 1 stick (1/2 cup) softened butter
  • Filling:
  • 5-6 slices of thick-cut bacon, diced
  • 1 leek, diced
  • 1/4 c grated Bleu/Asiago/Parmesan cheese
  • 1 large heirloom or beefsteak tomato, sliced
  • 3 whole eggs
  • 1 egg yolk
  • 1 1/4 c heavy cream
  • salt and pepper to taste

Directions

  1. Preheat oven to 375.
  2. Combine ingredients for the crust in a food processor, and pulse until pea-sized balls form. Turn the mixture out into your pie plate, and press the crust evenly into the bottom and up the sides of the plate.
  3. For the filling, brown the bacon in a large cast iron skillet and remove to a paper towel to drain the fat. In the same pan, brown the leeks with a dash of salt and pepper.
  4. In a medium-sized bowl, whisk together the eggs and yolk, cream, salt and pepper. Gently fold in the cooled bacon and leeks and pour the mixture into the prepared crust.
  5. Dot the top with bleu cheese crumbles, or whichever cheese of your choosing, then gently lay the sliced tomatoes over top.
  6. Bake the quiche at 375 for about 1 hour. When it’s done, the top will be golden and the filling will be just set in the middle.
  7. Let stand for about 20 minutes before slicing. If serving the next day, cool completely to room temperature, cover, then place in the fridge overnight.